Welcome to the official **Rytrak Store documentation**.
Here you will find everything needed to install, configure, and use Rytrak scripts properly, including framework integrations, troubleshooting guides, and advanced configuration.
Before opening any support ticket, please read this page carefully.
***
### Rytrak AI Support Assistant
To improve support quality and reduce response time, Rytrak Store provides a dedicated AI assistant trained specifically on Rytrak products.
This assistant already resolves approximately **90% of common issues**, including installation problems, configuration errors, and basic troubleshooting.
***
### Access the AI Support
Use the following link to start a conversation with the Rytrak Support Assistant:
**Rytrak Support ChatGPT**\
Using this assistant is strongly recommended before creating any support ticket.
***
### What the AI Assistant Can Help With
The assistant can help you with:
• Script installation\
• Dependencies\
• Configuration errors\
• Framework integration\
• Common FiveM issues\
• Basic debugging
***
### Before Opening a Ticket
You should only open a ticket if:
• The AI assistant could not solve your problem\
• You followed the documentation\
• You verified your installation\
• You can provide screenshots or videos\
• You clearly explain your issue
Tickets related to basic problems already covered by documentation or the AI assistant will be closed.
# FiveM Assets Escrow
Our resources use the system to secure our [FiveM Assets Escrow](https://forum.cfx.re/t/introducing-asset-escrow-for-your-resources/4777151) scripts**.**
After purchasing our resource on[ our site](https://rytrak.fr), go to FiveM's [keymaster ](https://keymaster.fivem.net/)site**,** then go to purchased assets.

## Download the script
{% hint style="warning" %}
**Note:** You must be the owner of the server keymaster to use the resource you purchased.
{% endhint %}

Click on the upload button and then move the file to your server. The resource will be ready to be configured!
## Transfer the resource to another account
{% hint style="danger" %}
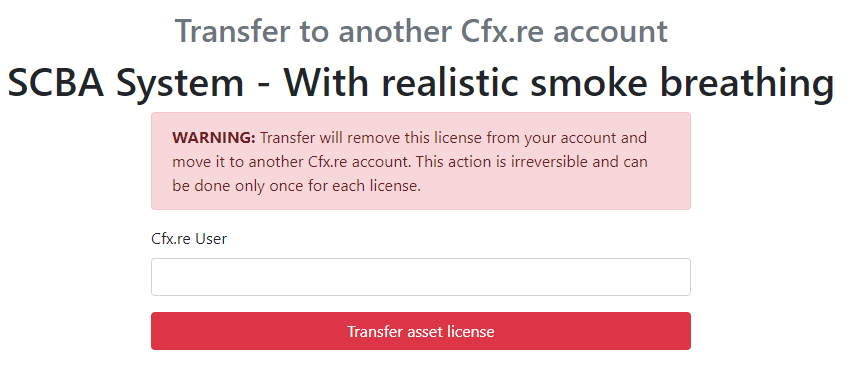
**Note:** Transfer will remove this license from your account and move it to another Cfx.re account. This action is irreversible and can be done only once for each license.
{% endhint %}
Click on the transfer to another account button, then indicate the Cfx.re name of the person to transfer to.
# You lack the required entitlement

{% hint style="success" %}
Try restarting your server and make sure your server license key is correct. If you bought the resource on the wrong account, you can transfer it to another account on keymaster.
{% endhint %}
# Failed to verify protected resource

{% hint style="success" %}
Your server artifacts are likely outdated. Update your server to version 5181 or above.
{% endhint %}
{% hint style="success" %}
Files were possibly corrupted during transfer. Ensure hidden files are copied; the `.fxap` file in a protected resource must be included. Some FTP programs skip these files.
{% endhint %}
{% hint style="success" %}
FileZilla can have problems with encrypted files, tried using [winscp ](https://winscp.net/eng/download.php)to install our resources
{% endhint %}
# Error parsing script / Failed to load script
{% hint style="success" %}
Your server artifacts are likely outdated. Update your server to version 5181 or above.
{% endhint %}
# Store FAQ
As far as the FAQ for each script is concerned, you will find a section dedicated to each script in our documentation.
# Do you accept orders to create a custom script
We do not take orders for custom scripts.
# Do you give decrypted scripts
We do not provide decrypted scripts, even for money. All our scripts are protected by security measures to prevent unauthorized copying or modification of our work.
# What payment methods are accepted for the purchase of your scripts?
We only accept the payment methods available in our store.
# Do you offer discounts or special offers on your scripts?
We announce all our special offers on the store discord in the giveaway channel.
# Can I modify or customize your scripts to meet my needs
Absolutely! We encourage our customers to customize our scripts to meet their specific needs. However, we would like to point out that some parts of our scripts are encrypted.
The parts that are not encrypted are usually the ones that can be easily customized, such as configuration files, commands, or even some function.
# Are your scripts compatible with frameworks
Our scripts are generally compatible with most frameworks, including ESX and QBCore. However, compatibility may vary depending on the version of your framework and our script.
To help you modify the code in our script, we have included an unencrypted cl\_utils.lua file that allows you to customize certain aspects of the framework's usage.
# Do you provide development assistance?
We do not provide technical development support for other projects or development issues in general, however our team is here to answer your questions about our scripts.
# Firefighter SCBA System
The **Advanced SCBA System** is a premium resource that simulates real-world breathing apparatus used by firefighters and emergency responders. Designed for immersive roleplay and operational realism, it’s perfect for fire rescue scenes, tunnel interventions, ship evacuations, factory hazards, and more.
✨ With dynamic pressure, evacuation tools, visual effects, and total customization, this script enhances both gameplay and immersion for any emergency response role.
***
#### What Does This Script Do?
🌫️ **Protect Against Hazardous Environments**\
Shields players from toxic gases, smoke, lack of oxygen, and dangerous particulates during missions.
🧑🚒 **Evacuation Hood System**\
Enable players to rescue others by equipping them with an emergency hood in critical situations.
😮💨 **Immersive Smoke and Coughing Effects**\
Simulates coughing and screen effects when exposed to smoke or fire without protection.
💨 **Realistic Pressure & Endurance System**\
Oxygen depletes dynamically based on the player's movement and actions — adding challenge and realism to rescue ops.
📟 **Animated Pressure Gauge**\
A fully synced and responsive gauge displays oxygen levels in real-time.
🔋 **Recharge Stations**\
Players can refill their SCBA tanks at designated vehicles or fixed refill points on the map.
🔊 **Custom SCBA Alarm System**\
Modify breathing and warning sounds to match your server's ambiance and style.
🎧 **Synchronized Audio Effects**\
Breathing and alarm sounds are fully synchronized across clients for immersive group gameplay.
🗣️ **Muffled Voice with PMA-Voice**\
If your server uses [PMA-Voice](https://github.com/AvarianKnight/pma-voice), the player’s voice becomes **muffled** when the SCBA mask is equipped — for extra realism in radio or voice interactions.
👕 **EUP & Peds Ready**\
Works with Emergency Uniform Pack or any custom ped — flexible for your server setup.
🔐 **Role/Job Restrictions**\
Limit SCBA access to specific jobs using your preferred framework (e.g. firefighters, hazmat units).
🌐 **Multilingual Support**\
English and French included by default. Easily customizable for other languages.
🔥 **Fire Script Compatibility**\
Seamless support for:
* SmartFires
* zFire by Zea
* FireScript by ToxicScripts
* Native GTA V fires
⚙️ **Fully Configurable**\
Every aspect — effects, pressure decay, sounds, permissions, animations — is editable to fit your exact server environment.
***
#### **Standalone & Flexible**
* ✅ Works flawlessly as a **standalone** script.
* 🔄 Fully adaptable to popular frameworks like **ESX or QB-Core**, allowing job restrictions for commands.
***
[Purchase it](https://store.rytrak.fr/package/4887016)
{% embed url="" %}
# General Configuration
This guide will help you customize the SCBA system to fit your server's needs, by explaining all available options in the `config.lua` file.
***
### 1. General Configuration
#### **Language**
Set the language used by the script for in-game texts.
```lua
Config.Language = 'en' -- Available: 'en' (English), 'fr' (French)
```
***
### 2. Framework Compatibility
{% hint style="danger" %}
**Note:** Only one framework should be active at a time.
{% endhint %}
**ESX Compatibility**
Enable SCBA access for specific ESX jobs.
```lua
Config.ESX = {
enabled = false,
jobs = {'firefighter', 'ems'}
}
```
**QB Compatibility**
Enable SCBA access for specific QB jobs.
```lua
Config.QB = {
enabled = false,
jobs = {'firefighter', 'ems'}
}
```
***
### 3. Command Usage
Enable or disable the `/scba` command as an alternative to EUP access.
```lua
Config.CommandEnabled = false
Config.Command = 'scba' -- Customizable command name
```
***
### 4. EUP Configuration
Defines the SCBA outfits for different scenarios, allowing customization of player appearance when wearing or not wearing the SCBA.
```lua
Config.EUP = {
[1] = {
Untie = {
[`mp_m_freemode_01`] = {[8] = {drawable = 56, texture = 0}},
[`mp_f_freemode_01`] = {[8] = {drawable = 24, texture = 0}}
},
Link = {
[`mp_m_freemode_01`] = {[8] = {drawable = 58, texture = 0}},
[`mp_f_freemode_01`] = {[8] = {drawable = 25, texture = 0}}
},
UntieDrawable = 15 -- Set default component used when removing SCBA.
}
}
```
* **Untie**: Defines the outfit components when the SCBA is untie.
* **Link**: Defines the outfit components when the SCBA is link.
Each entry specifies the drawable and texture IDs for the undershirt component (index 8) for male (`mp_m_freemode_01`) and female (`mp_f_freemode_01`) character models.
0: Face\ 1: Mask\ 2: Hair\ 3: Torso\ 4: Leg\ 5: Parachute / bag\ 6: Shoes\ 7: Accessory\ 8: Undershirt\ 9: Kevlar\ 10: Badge\ 11: Torso 2
To add more EUP configurations, create additional entries in the `Config.EUP` table with different indices (\[2], \[3], etc.) and define their respective `Untie` and `Link` settings (Don't forget to declare the id you defined in category 5. SCBA Retrieval)
***
### 5. SCBA Retrieval
**From Vehicles**
Allow SCBA to be retrieved from specific vehicle models.
(Number 1 corresponds to the eup number defined above in Config.EUP)
```lua
Config.VehicleAccess = {
[1] = {'firetruk', 'blista'}
}
Config.DriverCanTake = false -- Can drivers retrieve SCBA?
```
**From World Points**
If commands are disabled, define world points for retrieving SCBA.
(Number 1 corresponds to the eup number defined above in Config.EUP)
***
### 6. Mask Control
Disable key to manually attach/detach mask (useful when using custom exports).
```lua
Config.DisablePutMask = false
```
***
### 7. Recharge System
Recharge SCBA from vehicles or locations.
(Number 1 corresponds to the eup number defined above in Config.EUP)
```lua
Config.RechargeVehicles = {
[1] = {'firetruk', 'blista'}
}
Config.RechargeLocations = {
[1] = {
vector3(1194.29, -1487.11, 34.69),
vector3(1188.5, -1472.38, 34.69)
}
}
Config.RechargeRadius = 3.0, -- Adjusts radius to recharge the SCBA
Config.RechargeSpeed = 0.25 -- Recharge speed multiplier
```
***
### 8. Pressure System
Define initial SCBA pressure and how fast it depletes based on player activity.
```lua
Config.Pressure = 300 -- Max 400
Config.PressureDepletionIntervals = {
Sprinting = 100,
Walking = 200,
Still = 300
}
Config.PressureDepletionAmounts = {
Sprinting = 0.2,
Walking = 0.17,
Still = 0.12
}
```
Pressure alert sound thresholds:
```lua
Config.AlarmSound = {50, 290}
```
***
### 9. Visual & Audio Effects
Enable visual screen filter and voice muffling with PMA-Voice.
```lua
Config.VisualEffect = 'DefaultColorCode' -- Refer to: https://wiki.rage.mp/index.php?title=Timecycle_Modifiers
Config.VoiceEffect = true -- Requires PMA-Voice compatibility
```
***
### 10. Cough Block Zones
Cough Block Zones allow you to define specific areas where players will not cough even if near fire without wearing an SCBA. *(Used mainly to block campfires)*
#### Enable Cough Block Zones Activate or deactivate the system that blocks coughing in certain predefined zones.
```lua
Config.FireDamage.CoughBlockZones.enabled = false -- Set to true to enable cough-free zones.
```
#### Define Block Zones List the coordinates and radius of each area where coughing should be disabled.
```lua
Config.FireDamage.CoughBlockZones.list = {
{
coords = vector3(-440.57, 1594.07, 358.47), -- Example location (e.g., MRPD)
radius = 30.0 -- Radius (in meters) around the coordinates where coughing is blocked
},
{
coords = vector3(1850.0, 3680.0, 34.0), -- Another example (e.g., Sandy Shores Station)
radius = 25.0 -- Radius (in meters)
}
}
```
You can add as many locations as needed by following the structure shown above.
#### Define Block Props Blocks coughing when a player approaches a prop from the list in the setup
```lua
Config.FireDamage.CoughDisablePropsList = {'prop_beach_fire'}
```
***
### 11. Fire Damage System
Control how players are affected by fire when not wearing SCBA.
```lua
Config.FireDamage = {
SmartFires = {
enabled = false,
resourceName = 'SmartFires'
},
zFire = {
enabled = false,
resourceName = 'z_fire'
},
CoughInInterior = true,
CoughInExterior = true,
DamageNearFire = 4,
RadiusGetFire = 9.0,
CoughSound = true,
CoughDelay = 5000,
EvacuationEnable = true,
EvacuationMask = {
[`mp_m_freemode_01`] = { [1] = { component = 12 } },
[`mp_f_freemode_01`] = { [1] = { component = 12 } }
}
}
```
***
### 12. HUD Display
Customize the SCBA display HUD.
```lua
Config.NUI = {
Design = {
NUI = true, -- HUD display (bottom right)
Text = true -- Help text (bottom center)
},
SizeNUI = {
screenX = 0.905,
screenY = 0.83
}
}
```
***
### 13. Key Bindings
Define keys for SCBA interactions.
```lua
Config.Keys = {
PutMaskKey = 38,
PutMaskKeyString = '~INPUT_PICKUP~',
VerifyKey = 104,
VerifyKeyString = '~INPUT_VEH_SHUFFLE~',
ReloadKey = 47,
ReloadKeyString = '~INPUT_DETONATE~'
}
```
*Refer to the* [*FiveM Control Reference*](https://docs.fivem.net/docs/game-references/controls/) *for a list of control codes.*
***
### 14. Language Library
Edit the text displayed for different actions in multiple languages.
# Adapt your EUP
{% embed url="" %}
# General Exports
This page explains the available exports for the **r\_scba** script and how to use them. These client-side exports allow you to interact programmatically with the SCBA system from other resources.
***
### 1. Exports Overview
#### **1.1 Toggle SCBA**
```lua
exports['r_scba']:ToggleSCBA()
```
**Description:**\
Toggles the SCBA system on or off. This includes equipping or removing the oxygen mask, managing pressure, and applying visual and audio effects.
***
#### **1.2 Set SCBA Pressure**
```lua
exports['r_scba']:SetSCBAPressure(pressure)
```
**Description:**\
Sets a custom pressure value to the SCBA system.
**Parameters:**
* `pressure`: The pressure value you want to set.
***
#### **1.3 Set Player Coughing State**
```lua
exports['r_scba']:SetPlayerCough(bool)
```
**Description:**\
Allows you to enable or disable the coughing effect on a player.
**Parameters:**
* `bool`: Set to `true` to bypass coughing (e.g., during noclip), `false` to re-enable.
***
#### **1.4 Check if SCBA is Linked**
```lua
exports['r_scba']:IsSCBA()
```
**Description:**\
Returns whether the SCBA is currently linked and active.
**Returns:**
* `true`: If the SCBA is linked (mask equipped).
* `false`: If the SCBA is not active.
***
#### **1.5 Get Current SCBA Pressure**
```lua
exports['r_scba']:GetSCBAPressure()
```
**Description:**\
Returns the current pressure value of the SCBA.
**Returns:**
* The current SCBA pressure level.
***
#### **1.6 Check if Player is Coughing**
```lua
exports['r_scba']:IsPlayerCough()
```
**Description:**\
Checks if the player is currently coughing due to exposure (and other required conditions).
**Returns:**
* `true`: If the player is affected by coughing.
* `false`: Otherwise.
***
### 2. Example Usage
Here is a basic example of how to use the SCBA exports:
```lua
-- Toggle the SCBA system (equip or remove mask)
exports['r_scba']:ToggleSCBA()
-- Set SCBA pressure to 300
exports['r_scba']:SetSCBAPressure(300)
-- Disable coughing temporarily
exports['r_scba']:SetPlayerCough(true)
-- Check if SCBA is linked
if exports['r_scba']:IsSCBA() then
print("SCBA is active")
end
-- Get current pressure
local currentPressure = exports['r_scba']:GetSCBAPressure()
print("Current SCBA pressure: " .. currentPressure)
-- Check if player is coughing
if exports['r_scba']:IsPlayerCough() then
print("You are coughing due to smoke!")
end
```
# General Events
This page explains the available event for the **r\_scba** script and its usage. This event allows other resources to interact with the SCBA system programmatically, especially to dynamically manage EUP components based on the SCBA state.
***
### 1. Client-Side Events
#### 1.1 Set SCBA EUP State
* **Event Name:** `r_scba:client:setSCBA`
* **Description:** Updates the player's SCBA EUP state by adding or removing specific components.
* **Parameters:**
* `value` *(integer)*: Determines the SCBA visual configuration.
* `0`: Removes the SCBA EUP from the player.
* `1`: Adds the **unlinked** SCBA EUP (e.g., without the mask connected).
* `2`: Adds the **linked** SCBA EUP (e.g., full setup with mask connected).
> This is especially useful when you want to attach an additional EUP component (such as a mask, tube, or chest accessory) depending on the SCBA state.
***
### 2. Example Usage
Here’s how you can register and handle the event in your client script:
```lua
RegisterNetEvent('r_scba:client:setSCBA')
AddEventHandler('r_scba:client:setSCBA', function(value)
if value == 0 then
-- Remove SCBA component from player
elseif value == 1 then
-- Add SCBA EUP without mask (unlink)
elseif value == 2 then
-- Add full SCBA EUP with mask (link)
end
end)
```
# Create the SCBA Item for ox\_inventory
This guide explains how to create and configure the **SCBA item** for **ox\_inventory** so players can equip/remove the SCBA directly from their inventory.
***
### 1. Configure the SCBA ItemName in `config.lua`
In **r\_scba**, open:
* `r_scba/config.lua`
Find your EUP SCBA entry and set the new option:
```lua
ItemName = 'scba'
```
{% hint style="danger" %}
**Important:** This value **must match** the item name you will define in ox\_inventory.
{% endhint %}
***
### 2. Create the item in `ox_inventory/data/items.lua`
Open:
* `ox_inventory/data/items.lua`
Add this item definition:
```lua
['scba'] = {
label = 'MSA G1 SCBA',
weight = 10000,
stack = false,
consume = 0,
client = {
export = 'r_scba.SetSCBA'
}
},
```
#### What each value means
* **label**: Display name shown in the inventory
* **weight**: Item weight (example: `10000` = 10kg depending on your setup)
* **stack = false**: Prevents stacking multiple SCBAs in one slot (recommended)
* **consume = 0**: The item is **not consumed** on use (recommended)
* **client.export**: Calls the **client export** `r_scba.SetSCBA` when using the item
### 3. Add the SCBA image (icon) for ox\_inventory
ox\_inventory loads item images from:
```
ox_inventory/web/images/
```
You already have the SCBA icon here:
```
r_scba/scba.png
```
#### Copy the file
Move or copy:
```
r_scba/scba.png
```
into:
```
ox_inventory/web/images/scba.png
```
The file name must match the item name (`scba`).
***
### 4. Restart and test
After saving changes:
1. Restart the server
2. Give yourself the item:
* Use your admin menu / inventory give command (depends on your setup)
Then:
* Use the item in ox\_inventory → SCBA equips
* Use it again → SCBA removes (depending on your system logic)
# Create the SCBA Item for ESX
This page explains how to create and configure the **SCBA item** for **ESX**, using the built-in `server/sv_utils.lua` logic from **r\_scba**.
***
### 1. Enable ESX support in `r_scba/config.lua`
Open:
```
r_scba/config.lua
```
Enable ESX:
```lua
Config.ESX = {
enabled = true
}
```
Make sure **QBCore is disabled** if you’re not using it:
```lua
Config.QB = {
enabled = false
}
```
***
### 2. Set the SCBA item name in the config
In your SCBA EUP config entry, set the item name:
```lua
ItemName = 'scba'
```
This must match the ESX item name you create in the database.
***
### 3. Create the item in your ESX database
ESX items are usually stored in the **`items`** table.
Run this SQL query:
```sql
INSERT INTO items (name, label, weight) VALUES
('scba', 'MSA G1 SCBA', 10);
```
#### Notes
* `name` must be exactly: `scba`
* `label` is the display name
* `weight` depends on your ESX version / weight system
* If your ESX doesn’t use weight in the DB, remove the `weight` field from the query.
***
# Create the SCBA Item for QBCore
This guide explains how to create and configure the **SCBA item** for **QBCore**, using **r\_scba** with a usable item registered in `server/sv_utils.lua`.
***
### 1. Enable QBCore support in `r_scba/config.lua`
Open:
```
r_scba/config.lua
```
Enable QBCore:
```lua
Config.QB = {
enabled = true
}
```
Make sure **ESX is disabled** if you’re not using it:
```lua
Config.ESX = {
enabled = false
}
```
***
### 2. Set the SCBA ItemName in the config
In your SCBA EUP entry inside `Config.EUP`, set the item name:
```lua
ItemName = 'scba'
```
This **must match** the item name you will define in your QBCore inventory.
***
### 3. Create the SCBA item in QBCore inventory
#### If you use **qb-inventory**
Open:
```
qb-inventory/shared/items.lua
```
Add:
```lua
scba = {
name = 'scba',
label = 'MSA G1 SCBA',
weight = 10000,
type = 'item',
image = 'scba.png',
unique = true,
useable = true,
shouldClose = true,
description = 'Self-contained breathing apparatus.',
},
```
#### Field meaning (quick)
* **name**: internal item id (must be `scba`)
* **label**: display name
* **weight**: item weight
* **image**: icon file name
* **unique = true**: prevents stacking (recommended)
* **useable = true**: allows using the item
> If your inventory structure is slightly different, keep the same idea: item name **must equal** `ItemName`.
***
### 4. Add the SCBA icon (image)
Most QBCore inventories load images from:
```
qb-inventory/html/images/
```
You already have the icon here:
```
r_scba/scba.png
```
Copy it to:
```
qb-inventory/html/images/scba.png
```
The image filename must match the `image = 'scba.png'` value.
***
### 5. Restart and test
1. Restart the server (or restart affected resources)
2. Give yourself the item (`scba`)
3. Use it in your inventory
# FAQ
# No such export IsFireNearby in resource SmartFires
**Why does this error occur?**
This issue typically happens when the **SmartFires** script is not installed correctly, improperly configured, or outdated. The missing export `IsFireNearby` is a required function for compatibility with **r\_scba**.
**Steps to Fix This Issue**
1. **Reinstall the SmartFires Script**
* Download the latest version of the **SmartFires** script.
* Replace the existing files with the fresh installation.
2. **Verify the Script Name**
* Ensure the script is named exactly **SmartFires** in your resources folder.
* If you prefer to use a different name, update the configuration in the **r\_scba** script:
* Open the **r\_scba** configuration file.
* Locate the setting referencing **SmartFires**, as shown in the example image below.
* Replace the script name with your custom name.

1. **Check for the `IsFireNearby` Export**
* Open the file `cl_exports.lua` in the **SmartFires** script folder.
* Confirm that the following export is present at the top of the file:
* If the export is missing:
* Reinstall the **SmartFires** script to ensure it includes the required export.
* Make sure you are using the latest version of the script.
2. **Restart the Server**
* After completing the steps above, restart your server to apply the changes.
# Test it now
**Read more:** Test our resources for free with [Zap-Hosting](https://zap-hosting.com)
***
### Important Notes
* This demo server is configured with default settings and command-based usage.
* After purchasing, you can personalize your setup (e.g., EUP support, job restrictions, oxygen duration, pressure gauge, sounds, visuals).
* **Only the EUP male** is available on the test server. Do not use custom peds to equip the SCBA.
***
### Useful Test Commands
#### **1. Start a Fire**
```plaintext
/startfire normal 5 2
```
**Description:**\
Spawns a basic fire for testing smoke and coughing effects.
***
### Coordinates
Use the following positions to interact with the SCBA system:
**Take the SCBA**
```
x: 1194.68
y: -1488.11
z: 34.84
```
**Recharge the SCBA**
```
x: 1173.68
y: -1495.11
z: 35.84
```
You can also **recharge your SCBA** using specific vehicles such as:
* `firetruk`
* `blista`
Make sure you're close to the vehicle or recharge zone.
***
### How to Teleport
To teleport to the coordinates, open the vMenu via F1 and follow the image below.

# Advanced Police Grab Ped
The **Advanced Police Grab Ped** is a premium resource that allows players to physically control other players in immersive ways — perfect for law enforcement, emergency RP, kidnapping scenarios, and beyond.
✨ Designed for clean, realistic interactions, it enhances the quality of your roleplay scenes with custom animations and total flexibility.
***
#### **What Does This Script Do?**
🤝 **Take Players by the Arm**\
Smooth and realistic grabbing system — initiate interactions like arrests, rescues, or escorts.
🚗 **Put Players in Vehicles**\
Effortlessly place a grabbed player into a nearby vehicle (rear seat preferred).
🚪 **Remove Players from Vehicles**\
Take control of detained players by removing them from a vehicle with ease.
🎭 **Stylish & Configurable Animations**\
Choose to enable or disable animations for both the grabber and the grabbed.
🎮 **Command or Keybind Control**\
Choose how players interact: via custom commands, keybindings, or target UI.
🎯 **Target System Ready**\
Built-in support for:
* **ox\_target**
* **qb-target**
* Or your **own custom target system**
***
#### **Standalone & Flexible**
* ✅ Works flawlessly as a **standalone** script.
* 🔄 Fully adaptable to popular frameworks like **ESX or QB-Core**, allowing job restrictions for commands.
***
#### **RedM Compatibility**
Looking for a RedM version? It's available! Experience the same polished interactions tailored for RedM servers. [Learn more here](https://store.rytrak.fr/package/5940239)
***
[Purchase it](https://store.rytrak.fr/package/4919539)
{% embed url="" %}
# General Configuration
This guide will help you configure the script to suit your needs, covering all available options in the `config.lua` file. Each setting is explained step by step.
***
### **1. General Configuration**
#### **Language**
Set the language used by the script.
```lua
Config.Language = 'en' -- Available options: 'en' (English), 'fr' (French)
```
***
#### **Command System**
{% hint style="warning" %}
**Note:** If you are using a target system, disable the command system
{% endhint %}
Activate or deactivate commands for grabbing, putting, and removing players from vehicles.
Config.CommandSystem.Enabled = false -- Enable/disable the command-based interaction system. (WARNING! If you are using a system in the Target System, disable the command system)tions.
Config.CommandSystem.Grab = 'grab' -- Command to grab the person by the arm.
Config.CommandSystem.PutPlayer = 'putplayer' -- Command to put the person in a vehicle.
Config.CommandSystem.RemovePlayer = 'removeplayer' -- Command to take the person out of a vehicle.
*Commands can also be customized in the `cl_utils.lua` file.*
***
### **2. Target System Compatibility**
{% hint style="danger" %}
**Note:** Only one target system can be enabled at a time.
{% endhint %}
{% hint style="warning" %}
**Note:** If you are using the target system set *Config.CommandSystem.Enabled = false*
{% endhint %}
#### **ox\_target Compatibility**
Enables compatibility with `ox_target` to allow interaction with players.
```lua
Config.TargetSystem.UseOXTarget = false -- Set to true to enable ox_target compatibility.
```
#### **qb-target Compatibility**
Enables compatibility with `qb-target` to allow interaction with players.
```lua
Config.TargetSystem.UseQBTarget = false -- Set to true to enable qb-target compatibility.
```
**Custom Target System**
If you are using a custom targeting system, enable this option and follow the structure of the `client/ox_target.lua` or `client/qb_target.lua` files.
```lua
Config.TargetSystem.UseCustomTarget = false -- Set to true to enable a custom targeting system.
```
***
### **3. Compatibility with Frameworks**
{% hint style="danger" %}
**Note:** Only one framework system can be enabled at a time.
{% endhint %}
#### **ESX Compatibility**
Enable ESX compatibility and restrict functionality to specific jobs.
```lua
Config.Framework.ESX = {
enabled = false, -- Set to true to enable ESX compatibility.
jobs = { 'police', 'fbi' }, -- Jobs allowed to use the grab feature.
exceptionJobs = false -- If true, players with the listed jobs cannot be grabbed.
}
```
#### **QB Compatibility**
Enable QB compatibility and restrict functionality to specific jobs.
```lua
Config.Framework.QB = {
enabled = false, -- Set to true to enable QB compatibility.
jobs = { 'police', 'fbi' } -- Jobs allowed to use the grab feature.
}
```
***
### **4. Player Movement and Interactions**
#### Controls Disabled
```lua
DisableControls = {
disableSprint = true, -- Disable sprinting while carrying a player (recommended: true).
getOutVehicle = true, -- Prevents grabbed players from exiting the vehicle on their own.
},
```
***
#### **Collision Range**
Adjust the collision distance between the grabbed player and the carrier.
```lua
Config.CollisionRange = 0.5 -- Value range: 0.0 (disable collision) to desired distance.
```
***
#### **Grabbing Radius**
Define the distance required to grab a player.
```lua
Config.GrabbingRadius = 1.0 -- Recommended value: 1.0
```
***
#### **Attachment Position**
Set the position of the grabbed player relative to the carrier.
```lua
Config.AttachPosition = vector3(0.20, 0.45, 0.0) -- Modify as needed for positioning.
```
***
### **5. Animations**
Control animations for both the person grabbing and the person being grabbed.
```lua
Config.Animations = {
policeAnimation = {
enabled = true, -- Set to true to enable animations for the carrier.
animDict = 'amb@world_human_drinking@coffee@male@base',
anim = 'base'
},
citizenAnimation = {
enabled = false, -- Set to true to enable animations for the grabbed person.
animDict = 'amb@world_human_drinking@coffee@male@base',
anim = 'base'
}
}
```
***
### **6. Key Bindings**
#### **Keys for Interactions**
Set the keys used for actions when `CommandEnabled` is set to false.
```lua
Config.Keys = {
GrabAndDropKey = 289, -- Key to grab and release a person.
GrabAndDropKeyString = '~INPUT_REPLAY_START_STOP_RECORDING_SECONDARY~', -- Key name for display.
TaskEnterKey = 305, -- Key to put a person in the vehicle.
TaskEnterKeyString = '~INPUT_REPLAY_STARTPOINT~' -- Key name for display.
}
```
*Refer to the* [*FiveM Control Reference*](https://docs.fivem.net/docs/game-references/controls/) *for a list of control codes.*
***
### **7. Language Library**
Edit the text displayed for different actions in multiple languages.
# General Exports
This page explains the available exports for the **r\_grab** script and their usage. These exports allow you to interact with the script programmatically from other resources.
All exports are client side only.
### **1. Exports Overview**
#### **1.1 Grab a Player**
```lua
exports['r_grab']:GrabPlayer(player)
```
**Description:**\
This export allows you to drag a specified player.
**Parameters:**
* `player`: The server ID of the player you want to grab.
***
#### **1.2 Put the Player in a Vehicle**
```lua
exports['r_grab']:PutPlayerInVehicle()
```
**Description:**\
This export places the currently dragged player into the nearest vehicle.
**Usage:**\
Make sure the dragged player is near a vehicle before calling this function.
***
#### **1.3 Remove the Player from a Vehicle**
```lua
exports['r_grab']:RemovePlayerFromVehicle()
```
**Description:**\
This export removes the currently dragged player from the vehicle they are in.
**Usage:**\
Call this function to pull the dragged player out of a vehicle.
***
#### **1.4 Check if the Player is Being Dragged**
```lua
exports['r_grab']:IsGrabbed()
```
**Description:**\
This export checks if a player is currently being dragged.
**Returns:**
* `true`: If the player is being dragged.
* `false`: If the player is not being dragged.
***
### **2. Example Usage**
Below is an example of how to use these exports in your script:
```lua
-- Grab a player by their server ID
exports['r_grab']:GrabPlayer(1)
-- Put the dragged player in the nearest vehicle
exports['r_grab']:PutPlayerInVehicle()
-- Remove the dragged player from the vehicle
exports['r_grab']:RemovePlayerFromVehicle()
-- Check if the local player is being dragged
if exports['r_grab']:IsGrabbed() then
print("You are being dragged!")
else
print("You are not being dragged.")
end
```
# General Events
This page explains the available events for the **r\_grab** script and their usage. These events allow you to interact with the script programmatically from other resources.
### 1. Client-Side Events
#### **1.1 Grab or Release a Player**
**Event Name:** `r_grab:client:grabPlayer`
**Description:** This event allows grabbing or releasing a target player.
**Parameters:**
* `targetId` *(integer)*: The server ID of the player to grab.
***
#### **1.2 Put the Grabbed Player in a Vehicle**
**Event Name:** `r_grab:client:putPlayerInVehicle`
**Description:** Places the currently grabbed player into the nearest vehicle.
***
#### **1.3 Remove the Grabbed Player from a Vehicle**
**Event Name:** `r_grab:client:removePlayerFromVehicle`
**Description:** Removes the currently grabbed player from the vehicle they are in.
***
### 2. Server-Side Events
#### **2.1 Initiate Grab Action**
**Event Name:** `r_grab:server:grabPlayer`
**Description:** Initiates the grab action for a target player, ensuring the source and target are within range.
**Parameters:**
* `targetId` *(integer)*: The server ID of the player being grabbed.
**Notes:**
* The function checks if the target ID is valid.
* It verifies if the source player is within a 10.0 unit range of the target.
* If conditions are met, it triggers client-side events to update both players.
***
### 3. Example Usage
Below is an example of how to use these events in your script:
```lua
-- [[ Grab or release a player ]]
-- Client to server
TriggerServerEvent('r_grab:server:grabPlayer', 1)
-- Server to client
TriggerClientEvent('r_grab:client:grabPlayer', source, 1)
-- [[ Put the grabbed player in a vehicle ]]
-- Only server to client
TriggerClientEvent('r_grab:server:putPlayerInVehicle', source)
-- [[ Remove the grabbed player from the vehicle ]]
-- Only server to client
TriggerClientEvent('r_grab:client:removePlayerFromVehicle', source)
```
# Compatibility with esx\_policejob
This guide explains how to make the **esx\_policejob** script compatible with the **Advanced Police Grab Ped** resource. Follow the steps below to integrate the functionality smoothly.
***
### **1. Modify the `r_grab` Configuration**
Open the `config.lua` file of the **r\_grab** resource and make the following changes:
1. **Change the Grab Command**
```lua
Config.GrabCommand = '+grab'
```
2. **Change the Put Car Command**
```lua
Config.PutCarCommand = '+putcar'
```
***
### **2. Edit the `esx_policejob` Script**
Navigate to the `esx_policejob/client/main.lua` file and update it as follows:
#### **2.1 Modify the Drag Action**
Locate line **675** (or search for `elseif action == 'drag' then`) and replace the line below it:
**Before:**
```lua
TriggerServerEvent('esx_policejob:drag', GetPlayerServerId(closestPlayer))
```
**After:**
```lua
ExecuteCommand('+grab')
```
***
#### **2.2 Modify the Put In Vehicle Action**
Search for `elseif action == 'put_in_vehicle' then` and replace the line below it:
**Before:**
```lua
TriggerServerEvent('esx_policejob:putInVehicle', GetPlayerServerId(closestPlayer))
```
**After:**
```lua
ExecuteCommand('+putcar')
```
***
#### **2.3 Delete the Detach Thread**
Search for the `DetachEntity` function (around line **1565**) and remove the entire thread where it is used.
Refer to the GIF below for guidance:
***
### **3. Final Steps**
* Save all changes to the `r_grab` and `esx_policejob` files.
* Restart your server to apply the updates.
# Test it now
Read more: [Test our resources for free with Zap-Hosting](/test-our-resources-for-free-with-zap-hosting)
***
### **Important Notes**
* The test server uses a **command-based system** for interaction.
* After purchasing, you can configure the script for easier and more personalized use (e.g., keybinds instead of commands, ox\_target, qb-target).
***
### **Available Commands**
Here are the commands available on the test server:
#### **1. Grab a Player**
```
/+grab
```
**Description:**\
Allows you to grab a player by the arm.
**Requirements:**
* You must be **next to a person** to use this command.
***
#### **2. Put a Player in a Vehicle**
```
/+putplayer
```
**Description:**\
Allows you to place the grabbed player into the **rear door** of a nearby vehicle.
**Requirements:**
* You must be **next to a rear door of a vehicle** to use this command.
***
#### **3. Remove a Player from a Vehicle**
```
/+removeplayer
```
**Description:**\
Allows you to remove the player who was previously placed in a vehicle.
**Requirements:**
* You must be **next to the player** in the vehicle.
***
#### **Next Steps**
* Connect to the test server and try out the commands.
* Refer to the configuration documentation after purchasing to personalize the script for your server.
# Advanced Pepper Spray
**Advanced Pepper Spray** is a premium and fully customizable resource for FiveM servers. This script allows you to add a realistic and immersive pepper spray feature to incapacitate suspects or targets, perfect for law enforcement and roleplay scenarios. With realistic sound effects, decontamination spray, a recharge system, and gas mask protection, this script ensures a dynamic and engaging experience.
***
#### **What Does This Script Do?**
💨 **Realistic Sound & Visual Effects**\
Experience realistic sound and visual effects when using the **Pepper Spray**, enhancing the immersion of your roleplay with each use.
🧴 **Gas Effect System**\
Use the **Pepper Spray** to incapacitate your target. The gas has a unique visual and sound effect, making the experience even more immersive and realistic.
💥 **Decontamination System**\
The decontamination spray allows players to cleanse themselves from the effects of the pepper spray, reducing the gas's impact.
🔋 **Recharge System**\
To prevent overuse of the **Pepper Spray**, the script features a configurable recharge system, allowing players to refill their sprays at designated points on the map.
🔴 **Gas Mask Protection**\
Players wearing a gas mask are protected from the effects of the **Pepper Spray**. You can customize the gas mask models and the effects they have.
🦸♂️ **Command and Permission System**\
Fully compatible with **ESX**, **QBCore**, and **standalone** setups, the script allows easy configuration of permissions and can integrate commands with your inventory or roleplay interactions.
🎛️ **Fully Configurable Behavior**\
Customize keys, spray effects, descent speed, spray range, and much more. You can fully adapt the script’s behavior to your server's needs.
#### **Additional Features:**
* **Spit and Rubbing Mechanics**: Players can spit or rub their eyes to reduce the gas effect.
* **Gas Mask Protection**: Players with a gas mask will be immune to the spray’s effects.
***
#### **Standalone & Flexible**
* ✅ Works flawlessly as a **standalone** script.
* 🔄 Fully adaptable to popular frameworks like **ESX or QB-Core**, allowing job restrictions for commands.
***
[Purchase it](https://store.rytrak.fr/package/4950985)
{% embed url="" %}
# General Configuration
This guide will help you configure the script to suit your needs, covering all available options in the `config.lua` file. Each setting is explained step by step.
### **1. General Configuration**
**Language**\
Set the language used by the script.
```lua
Config.Language = 'en' -- Available options: 'en' (English), 'fr' (French).
```
***
### 2. Framework Compatibility
If you're using a framework like **ESX**, **QB**, or **OX Inventory**, enable this setting.
```lua
Config.UseFramework = false
```
* When `true`, the system uses the inventory (e.g., weapon usage) instead of command-based interactions.
* Setup instructions for each framework are available on:
* [ESX Guide](https://docs.rytrak.fr/framework-compatibility/add-a-custom-weapon-on-esx)
* [QBCore Guide](https://docs.rytrak.fr/framework-compatibility/add-a-custom-weapon-on-qbcore)
* [OX Inventory Guide](https://docs.rytrak.fr/framework-compatibility/add-a-custom-weapon-on-ox-inventory)
***
### 3. Inventory Management
**Auto Remove Empty Items**\
Automatically removes empty pepper spray or antidote items from the inventory based on your framework.
```lua
Config.AutoRemoveEmptyItems = {
enabled = false,
framework = {
ESX = false,
QBCore = false,
OXInventory = false
}
}
```
***
### 4. Recharge System
**Recharge Locations**\
Defines coordinates where players can refill their sprays.
```lua
Config.RechargeLocations = {
vector3(-323.72, -1465.74, 30.55),
vector3(-313.63, -1461.49, 30.54)
}
Config.RechargeRadius = 3.0 -- Radius around the recharge point (in meters)
```
***
### 5. Player Control Settings
Disable certain actions when affected by gas.
```lua
Config.DisableControl = {
Sprint = true,
EnterVehicle = true,
Fight = true
}
```
***
### 6. Weapon Settings
**Weapon Display Names**\
Names displayed in the weapon wheel.
```lua
Config.WeaponWheelName = {
pepperspray = 'Pepper Spray',
antidote = 'Antidote'
}
```
**Cooldown Delay**\
Sets the cooldown time between certain actions to prevent spam.
```lua
Config.CooldownDelay = 500 -- In milliseconds
```
***
### 7. Pepper Spray Configuration
You can define multiple pepper spray types with their own stats.
```lua
Config.PepperSpray = {
['pepperspray'] = {
weaponModel = 'WEAPON_PEPPERSPRAY', -- Weapon model name
sprayQuantity = 500, -- Maximum spray capacity
sprayDescentSpeed = 10, -- How quickly the spray runs out
sprayRange = 4, -- Effective range
sprayDamageMultiplier = 1, -- Affects how quickly the gas effect builds up
gasDescentSpeed = 500, -- How quickly the gas effect fades
coughEnabled = true, -- Enable coughing when the player is affected by the gas.
coughSound = true, -- Enable sound effect when the player coughs. (only if the cough system is enabled)
spitEnabled = true, -- Can the player spit to reduce effects?
spitDescentSpeed = 5, -- Gas reduction per spit
spitTimeout = 10000, -- Delay between spits in ms
rubbingEnabled = true, -- Can the player rub their eyes?
rubbingDescentSpeed = 2.0, -- Gas reduction speed when rubbing
selfDecontamination = true, -- Allow use of decontamination spray
effect = {
timecycle = {
[1] = { name = 'ufo', opacity = 1.0 },
[2] = { name = 'MP_death_grade_blend01', opacity = 0.8 }
},
shakeCamera = {
name = 'DRUNK_SHAKE',
intensity = 3.0
}
},
particle = {
dict = 'core',
particle = 'exp_sht_extinguisher',
particleCoords = vector3(0.10, 0.0, 0.0),
particleRotation = vector3(-80.0, 0.0, -90.0),
particleSize = 0.5
},
gasMask = {
[`mp_m_freemode_01`] = { [1] = {}, [2] = {} },
[`mp_f_freemode_01`] = { [1] = {}, [2] = {} }
}
}
}
```
***
### 8. Decontamination Spray
```lua
Config.Decontamination = {
command = 'antidote', -- Command to receive the spray
weaponModel = 'WEAPON_ANTIDOTE', -- Model used for the spray
decontaminationQuantity = 100, -- Max amount available
decontaminationDescent = 10, -- How long the effect takes to go down
decontaminationCooldown = 2000, -- Cooldown between uses
decreaseLevel = 10, -- How much the effect is reduced per use
particle = {
dict = 'scr_bike_business',
particle = 'scr_bike_spraybottle_spray',
particleCoords = vector3(0.30, 0.0, 0.0),
particleRotation = vector3(-80.0, 0.0, -90.0),
particleSize = 1.5
}
}
```
***
### 9. Progress Bar Design
Customize the look of the progress bar when recovering.
```lua
Config.Design = {
ProgressBar = {
color = {52, 152, 219}, -- RGB color of the bar
text = 'RECOVERY' -- Max 8 characters, leave empty to hide text
}
}
```
***
### 7. Key Bindings
#### Spit Key
Set the key used to spit out the gas.
```lua
Config.Keys.SpitKey = 47 -- Key to spit the gas (default: G)
Config.Keys.SpitKeyString = '~INPUT_DETONATE~' -- Display name for the spit key
```
#### Rubbing Key
Set the key used to rub the eyes and reduce the gas effect.
```lua
Config.Keys.RubbingKey = 104 -- Key to rub the eyes (default: H)
Config.Keys.RubbingKeyString = '~INPUT_VEH_SHUFFLE~' -- Display name for the rubbing key
```
#### Replace Key
Set the key used to replace your pepper spray or antidote.
```lua
Config.Keys.ReplaceKey = 47 -- Key to replace the pepper spray (default: G)
Config.Keys.ReplaceKeyString = '~INPUT_DETONATE~' -- Display name for the replace key
```
***
### **8. Language Library**
Edit the text displayed for different actions in multiple languages.
# General Exports
This page explains the available exports for the **r\_pepperspray** script and how to use them. These client-side exports allow you to interact programmatically with the pepper spray system from other resources.
***
### **1. Exports Overview**
#### 1.1 **SetGassedPlayer**
```lua
exports['r_pepperspray']:SetGassedPlayer(weaponName)
```
**Description:**\
Applies the gas effect to the player based on the specified command (e.g., **pepper spray**).
**Parameters:**
* `weaponName`: The command identifying the type of gas effect to apply (e.g., **pepper spray**).
***
#### 1.2 **RemoveGas**
```lua
exports['r_pepperspray']:RemoveGas()
```
**Description:**\
Removes the gas effect from the player.
***
#### 1.3 **SetPepperQuantity**
```lua
exports['r_pepperspray']:SetPepperQuantity(quantity)
```
**Description:**\
Sets the amount of spray available to the player (either **pepper spray** or **decontamination spray**).
**Parameters:**
* `quantity` (number): The amount of spray to set for the player.
***
#### 1.4 **IsGassed**
```lua
exports['r_pepperspray']:IsGassed()
```
**Description:**\
Returns whether the player is currently gassed or not.
**Returns:**
* `true`: If the player is gassed.
* `false`: If the player is not gassed.
***
### **2. Example Usage**
Here’s a basic example of how to use the **pepper spray** exports:
```lua
-- Apply the pepper spray effect to the player
exports['r_pepperspray']:SetGassedPlayer('pepperspray')
-- Remove the gas effect from the player
exports['r_pepperspray']:RemoveGas()
-- Set the pepper spray quantity for the player to 5
exports['r_pepperspray']:SetPepperQuantity(5)
-- Check if the player is gassed
local isGassed = exports['r_pepperspray']:IsGassed()
if isGassed then
print("Player is gassed!")
else
print("Player is not gassed.")
end
```
# Anticheat
If you have an anticheat that uses the native SetPlayerLockon, you have to make an exception to activate the aiming aid only if the player has the pepperspray or the antidote in hand, otherwise the script won't work 100%
# Test it now
Read more: [Test our resources for free with Zap-Hosting](/test-our-resources-for-free-with-zap-hosting)
**Important Notes:**
* You must have at least two players connected to properly test the pepperspray functionality.
* The configuration used on the test server may differ from your ideal setup.
***
### **How to Test the Pepper Spray on the Test Server**
1. **Give Yourself the Pepper Spray** To give yourself the Pepper Spray, use the following command in the chat:
```
/giveitem me WEAPON_PEPPERSPRAY
```
2. **Give Yourself the Decontamination Spray** To give yourself the Decontamination Spray, use this command:
```
/giveitem me WEAPON_ANTIDOTE
```
3. **Open Your Inventory** Press **F2** to open your in-game inventory.
4. **Use the Pepper Spray** Once the **Pepper Spray** is in your inventory, drag it to the use button to equip and use it.
5. **Use the Decontamination Spray** To cleanse yourself from the effects of the **Pepper Spray**, use the **Decontamination Spray** in the same manner.
***
### Test Environment
* The **Pepper Spray** and **Decontamination Spray** can be used by any player who has them in their inventory.
* Test the functionality by using the **Pepper Spray** and **Decontamination Spray** on yourself or other players in different scenarios.
#### Coordinates:
* **Pepper Spray Refill Coordinates:**
* **x:** -323.72
* **y:** -1465.74
* **z:** 30.55
* **Decontamination Spray Refill Coordinates:**
* Same as above, for both sprays.
You can teleport to these coordinates to refill your **Pepper Spray** and **Decontamination Spray**.
### How to Teleport
To teleport to the coordinates, open the vMenu via F1 and follow the image below.

# Advanced Megaphone System
The **Advanced Megaphone System** is a **premium and fully customizable** resource for FiveM servers. Whether you're a police officer giving orders from a vehicle, or organizing a large-scale event, this system brings realistic communication tools to your roleplay experience.
***
#### **What Does This Script Do?**
📢 **Simulate Real Megaphone Usage**\
Use a megaphone in a natural and immersive way, whether on foot or inside a vehicle — perfect for public announcements or law enforcement commands.
🚔 **Vehicle Megaphone Integration**\
Speak through a megaphone from inside allowed vehicles (like police cars or ambulances), adding depth to patrols, interventions, or traffic control.
🔊 **Custom Voice Effects & Volume Control**\
Experience real megaphone-like sound with adjustable volume and frequency filters.
🎛️ **Fully Configurable Behavior**\
Define the vehicles allowed to use the megaphone, customize the keys, distance, volume, and even allow dynamic usage through exports or inventory integration.
***
#### **Standalone & Flexible**
* ✅ Works flawlessly as a **standalone script**.
* 🔄 Fully adaptable to popular frameworks like **ESX** or **QB-Core**, allowing inventory-based interaction or job restrictions.
***
#### **Voice System Compatibility**
* 🎙️ Compatible with **PMA-Voice**, **SaltyChat**, **YACA**, and **Mumble-VOIP**.
* 📁 Easy integration with prebuilt files and documentation to guide you through setup.
***
[Purchase it](https://store.rytrak.fr/package/5003349)
{% embed url="" %}
# General Configuration
This guide will help you configure the script to suit your needs, covering all available options in the `config.lua` file. Each setting is explained step by step.
***
### **1. General Configuration**
#### **Language**
Set the language used by the script.
```lua
Config.Language = 'en' -- Available options: 'en' (English), 'fr' (French)
```
***
### 2. Framework Compatibility
If you're using a framework like **ESX**, **QB**, or **OX Inventory**, enable this setting.
```lua
Config.UseFramework = false
```
* When `true`, the system uses the inventory (e.g., weapon usage) instead of command-based interactions.
* Setup instructions for each framework are available on:
* [ESX Guide](https://docs.rytrak.fr/framework-compatibility/add-a-custom-weapon-on-esx)
* [QBCore Guide](https://docs.rytrak.fr/framework-compatibility/add-a-custom-weapon-on-qbcore)
* [OX Inventory Guide](https://docs.rytrak.fr/framework-compatibility/add-a-custom-weapon-on-ox-inventory)
***
### **3. Voice System Compatibility**
{% hint style="warning" %}
**Note:** Only one voice system can be enabled at a time.
{% endhint %}
#### **PMA-Voice Compatibility**
Enable this option if your server uses **PMA-Voice**.
```lua
Config.Compatibility.PMAVoice = {
enabled = false, -- Set to true if using PMA-Voice.
resourceName = 'pma-voice' -- Name of the PMA-Voice resource.
}
```
{% hint style="danger" %}
**Important:** If enabled, check the [official documentation](https://docs.rytrak.fr/scripts/advanced-megaphone-system/adapt-our-script-with-pma-voice).
{% endhint %}
***
#### **SaltyChat Compatibility**
Enable this option if your server uses **SaltyChat**.
If you're not sure which version of SaltyChat you are using:
* Try enabling the **new version** (`UseNewVersion = true`).
* Launch the game and test the megaphone.
* If you see an error in the **F8 client console**, switch to `UseNewVersion = false` and set `UseOldVersion = true`.
```lua
Config.Compatibility.SaltyChat = {
UseNewVersion = true, -- Use this for the latest SaltyChat (LUA or C# integration)
UseOldVersion = false -- Use this for older versions of SaltyChat support
}
```
***
#### **YACA Compatibility**
Enable this option if your server uses **YACA**.
```lua
Config.Compatibility.YACA = {
enabled = false, -- Enable if using YACA.
resourceName = 'yaca' -- Name of the YACA resource.
}
```
***
#### **Mumble-VOIP Compatibility**
Enable this option if your server uses **Mumble-VOIP**.
```lua
Config.Compatibility.MumbleVOIP = false -- Set to true if using Mumble-VOIP.
```
{% hint style="danger" %}
**Important:** If enabled, check the [official documentation](https://docs.rytrak.fr/scripts/advanced-megaphone-system/adapt-our-script-with-mumble-voip) for further setup.
{% endhint %}
***
### **4. Megaphone Behavior Settings**
#### **Auto Push-to-Talk**
Automatically activates push-to-talk while using the megaphone.
```lua
Config.AutoTalk = true -- Set to true to auto-enable push-to-talk when using the megaphone.
```
#### **Talk Distance**
Defines the speaking range of the megaphone.
```lua
Config.TalkDistance = 35.0 -- Adjust the distance players can hear the megaphone.
```
*For PMA-Voice users, modify this in `@pma-voice/client/megaphone.lua`.*
#### **Manage Volume**
Allows players to adjust megaphone volume.
```lua
Config.ManageVolume = true -- Set to true to enable volume control.
Config.Volume = 1.0 -- Default volume level.
```
#### **Voice Effects**
Applies frequency filters to simulate a real megaphone sound.
```lua
Config.Effects = {
frequencyLow = 200.0, -- Low-frequency filter.
frequencyHigh = 9000.0 -- High-frequency filter.
}
```
#### **Disable Joystick Controller**
```lua
Config.DisableJoystickController = false -- Disables the megaphone when the player uses a joystick
```
***
### **5. Vehicle Configuration**
#### **Enable Megaphone in Vehicles**
Allows megaphone usage while inside a vehicle.
```lua
Config.Vehicles.enabled = true -- Set to true to enable in-vehicle megaphone.
```
#### **Vehicle Notification Hint**
Displays a notification when inside a vehicle with a megaphone.
```lua
Config.Vehicles.hint = {
enabled = true, -- Show hint at the top left of the screen.
timeout = 4000 -- Display duration in ms.
}
```
#### **Restrict to Emergency Vehicles**
Limits megaphone use to emergency vehicles only.
```lua
Config.Vehicles.emergencyOnly = true -- Set to true to restrict usage to emergency vehicles.
```
#### **Additional Allowed Vehicles**
Specify additional vehicles that can use the megaphone.
```lua
Config.Vehicles.additionalVehicles = {
'police',
'fbi'
}
```
#### **Allowed Seat Positions**
Define which vehicle seats can use the megaphone.
```lua
Config.Vehicles.allowedSeats = {-1, 0} -- -1 = Driver, 0 = Front Passenger.
```
***
### **6. Megaphone Weapon Settings**
#### **Define Megaphone as a Weapon**
Sets the megaphone as a weapon in the game.
```lua
Config.Weapon = `WEAPON_MEGAPHONE` -- Megaphone weapon identifier.
```
#### **Megaphone Display Name**
Name displayed in the weapon wheel when equipping the megaphone.
```lua
Config.MegaphoneWeaponName = "Megaphone"
```
***
### **7. Key Bindings**
#### **Keys for Interaction**
Set the keys used for speaking into the megaphone.
```lua
Config.Keys = {
SpeakKey = 92, -- Key to activate megaphone speaking.
SpeakKeyString = '~INPUT_VEH_PASSENGER_ATTACK~', -- Display name for SpeakKey.
SpeakInVehicleKey = 311, -- Key to activate megaphone inside a vehicle.
SpeakInVehicleKeyString = '~INPUT_REPLAY_SHOWHOTKEY~' -- Display name for SpeakInVehicleKey.
}
```
Refer to the [FiveM Control Reference](https://docs.fivem.net/docs/game-references/controls/) for a list of control codes.
***
### **8. Language Library**
Edit the text displayed for different actions in multiple languages.
# General Exports
This page explains the available **client-side** exports for the **r\_megaphone** and their usage. These exports allow you to interact with the script programmatically from other resources.
***
### **1. Exports Overview**
#### **1.1 Load Megaphone for a Vehicle**
```lua
exports['r_megaphone']:LoadVehicleMegaphone(vehicle)
```
**Description:**\
This export enables the **megaphone system** in a specific vehicle without having to define it in the configuration.
**Parameters:**
* `vehicle`: The vehicle entity where you want to activate the megaphone system.
**Example Usage:**
```lua
exports['r_megaphone']:LoadVehicleMegaphone(GetVehiclePedIsIn(PlayerPedId(), false))
```
***
#### **1.2 Unload Megaphone from a Vehicle**
```lua
exports['r_megaphone']:UnloadVehicleMegaphone(vehicle)
```
**Description:**\
This export disables the **megaphone system** on a vehicle that was previously loaded using `LoadVehicleMegaphone()`.
**Parameters:**
* `vehicle`: The vehicle entity where you want to disable the megaphone system.
**Example Usage:**
```lua
exports['r_megaphone']:UnloadVehicleMegaphone(GetVehiclePedIsIn(PlayerPedId(), false))
```
# Compatibility with pma-voice
This guide explains how to make the **Advanced Megaphone System** compatible with **PMA-Voice**.
***
## **1. Installation & Basic Setup**
{% embed url="" %}
1. **Install PMA-Voice and the LATEST version of r\_megaphone on your server.**
2. **Enable PMA-Voice compatibility in the `config.lua` file of r\_megaphone:**
* Open the `config.lua` file of **r\_megaphone**.
* Modify the following settings:
```lua
Config.Compatibility.PMAVoice.enabled = true
Config.Compatibility.PMAVoice.resourceName = 'pma-voice'
```
3. **Manually create the `megaphone.lua` file in pma-voice:**
* Navigate to the folder:
```
../pma-voice/client/
```
* Create a new file named `megaphone.lua`.
4. **Add the following code to `megaphone.lua`:**
You can change the distance of the megaphone's range using the first line.
```lua
table.insert(Cfg.voiceModes, {35.0, 'Megaphone'})
exports('setMegaphone', function(previousVoiceRange)
if not previousVoiceRange then
mode = #Cfg.voiceModes
setProximityState(Cfg.voiceModes[#Cfg.voiceModes][1], true)
else
mode = previousVoiceRange
setProximityState(Cfg.voiceModes[previousVoiceRange][1], false)
end
end)
exports('getMegaphone', function()
return mode
end)
RegisterCommand('cycleproximity', function()
if GetConvarInt('voice_enableProximityCycle', 1) ~= 1 or disableProximityCycle then return end
local newMode = mode + 1
if newMode <= #Cfg.voiceModes and newMode ~= #Cfg.voiceModes - 1 then
mode = newMode
else
mode = 1
end
setProximityState(Cfg.voiceModes[mode][1], false)
TriggerEvent('pma-voice:setTalkingMode', mode)
end, false)
if gameVersion == 'fivem' then
RegisterKeyMapping('cycleproximity', 'Cycle Proximity', 'keyboard', GetConvar('voice_defaultCycle', 'F11'))
end
```
1. **Modify `fxmanifest.lua` in pma-voice:**
* Open the `fxmanifest.lua` file of **pma-voice**.
* Add the following line at the end of the file:
```lua
client_script 'client/megaphone.lua'
```
2. **Ensure the correct startup order in `server.cfg`:** Make sure **pma-voice** is started before **r\_megaphone** in your **`server.cfg`**:
```txt
ensure pma-voice
ensure r_megaphone
```
3. **Restart your server to apply the changes.**
***
### **2. Common Errors & Solutions**
**Why does this issue occur?**\
This error typically appears when `r_megaphone` is started for the first time without restarting the server. The script tries to auto-generate a file named `megaphone.lua` inside the `pma-voice` script.\
However, it might fail due to:
#### **2.1 Error: `r_megaphone`** must contain the following line in your server.cfg **file to work**
**Cause:**\
The r\_megaphone script needs this line to produce the appropriate voice effects.
**Solution:**\
Check that this line appears in the `server.cfg`. If not, add it.
```cfg
setr voice_enableSubmix 1
```
***
#### **2.2 Error: `r_megaphone` must be started after `pma-voice` in the server.cfg file!**
**Cause:**\
`r_megaphone` depends on `pma-voice` and must load afterward to access its functions.
**Solution:**\
Adjust your `server.cfg`:
```cfg
ensure pma-voice
ensure r_megaphone
```
# Compatibility with mumble-voip
In order to make **mumble-voip** compatible with our megaphone, you must install the latest version of mumble-voip available [here](https://github.com/FrazzIe/mumble-voip-fivem), then activate in the configuration of the megaphone script Config.Compatibility.others
{% hint style="danger" %}
**Good to know:** For the moment, mumble-voip does not offer you the possibility to have the effect on the voice on the megaphone (you can use pma-voice to get it)
{% endhint %}
# FAQ
# I can't hear my voice through the megaphone
**Why does this happen?**
This is expected behavior. Currently, the **megaphone** script does not support a personal echo feature, meaning you won’t hear your own voice when using the megaphone.
**Is this a bug?**
No, this is not a bug. The script is designed this way, and the lack of personal echo is intentional.
**Can this be fixed or added?**
* At this time, the **megaphone** script does not include a personal echo feature.
* If this feature becomes available in the future, an update will be provided to include it.
**What should I do in the meantime?**
You can continue using the megaphone as intended. Your voice will be broadcasted to others on the server, even if you cannot hear it yourself.
# Test it now
Read more: [Test our resources for free with Zap-Hosting](/test-our-resources-for-free-with-zap-hosting)
***
### **Important Notes**
* The test server uses **PMA-Voice**, make sure your **voice chat is active** in GTA V.
* You **must be at least two players** connected to properly test the megaphone feature.
* The configuration used on the test server may differ from your ideal setup.
***
### **How to Use the Megaphone on the Test Server**
#### **1. Give Yourself the Megaphone**
Use the following command:
```bash
/giveitem me WEAPON_MEGAPHONE
```
#### **2. Open Your Inventory**
Press `F2` to access your inventory in-game.
#### **3. Use the megaphone item**
Take the megaphone from your inventory and drag it onto the use button.
***
### **Test Environment**
* By default, only emergency vehicles and predefined vehicles (`police`, `fbi`, etc.) are allowed to use the megaphone.
* You must **enter the driver or front passenger seat** of an allowed vehicle to activate the megaphone.
* Press the **key configured in the script** (by default: `B` ) to speak.
# Advanced Helicopter Bucket
**Advanced Helicopter Bucket** is a premium resource for FiveM designed to bring a new level of realism to aerial firefighting operations. This script allows players to operate a realistic helicopter bucket system, making water drops more immersive, dynamic, and engaging.
✨ *Fully customizable*, with a complete configuration system, the resource can easily be adapted to the needs of your server!
***
#### **What Does This Script Do?**
🔥 **Fire Health System**\
Introduces a realistic fire health system, allowing water drops to actively affect fires and making aerial firefighting operations more immersive.
💧 **Water Reloading**\
Access configured water points to refill your helicopter bucket, ensuring continuous and realistic firefighting operations.
🌫️ **Water Vapor**\
Adds realistic water vapor and spray effects during water drops, creating a more immersive visual experience.
🚁 **Realistic Helicopter Bucket**\
Deploy and operate a fully functional helicopter bucket designed specifically for aerial firefighting operations.
📊 **Water Level System**\
Keep track of the remaining water in your bucket with an accurate water level system, allowing pilots to better manage their firefighting operations.
🔔 **Drop Alarm**\
A dedicated alarm system warns the pilot before releasing the water, helping prevent accidental drops and improving operational control.
🎮 **Command or Keybind Control**\
Choose how players interact with the resource through configurable commands, keybinds, or other supported interaction systems.
🎯 **Framework System Ready**\
Compatible with the most popular FiveM frameworks:
* ESX
* QB-Core
* Or standalone setups.
🌍 **Multilingual Support**\
Available in both French and English, with the ability to add your own language directly through the configuration.
***
#### **Standalone & Flexible**
* ✅ Works flawlessly as a **standalone** resource.
* 🔄 Fully adaptable to popular frameworks like **ESX or QB-Core**, allowing you to restrict features based on player jobs.
* ⚙️ Extensive configuration options allow you to easily customize the resource to match your server.
***
[Purchase it](https://store.rytrak.fr/package/5167319)
{% embed url="" %}
# General Configuration
This guide will help you configure the script to suit your needs, covering all available options in the `config.lua` file. Each setting is explained step by step.
***
### **1. General Configuration**
#### **Language**
Set the language used by the script.
```lua
Config.Language = 'en' -- Available options: 'en' (English), 'fr' (French)
```
#### **Debug**
Display debug messages in the f8 client
```lua
Config.Debug = false
```
***
### 2. Framework Compatibility
```lua
Config.ESX = false
Config.QB = false
```
Enable compatibility with **ESX** or **QBCore** frameworks.\
Set to `true` if you want to restrict interactions (e.g., water drop, siren control) to specific jobs defined under each helicopter (see `manageJobs` under the helicopter config).
***
### 3. Helicopter Configuration
Create as many helicopter entries as you want using their in-game model names.
* `ropOffset`: Offset of the rope from the helicopter
* `waterScale`: Size of the water drop visual effect.
* `manageJobs`: Restrict control to jobs (only applies if ESX or QB is enabled).
* `manageSeat`: Determines which seats can operate the system. -1 = driver, 0 = right front passenger, 1 = left rear passenger, 2 = right rear passenger
* `siren`:
* `enabled`: Enables or disables the water drop siren.
* `soundName`: Name of the siren sound played.
* `distance`: Maximum distance where the siren is audible.
* `capacity`: Total water tank capacity in liters.
* `pumpPower`: Speed at which water is pumped into the tank.
* `waterDischargePower`: Flow rate of the water during drop.
***
#### 4. HUD Display
```lua
Config.HUD = {
Text = true,
NUI = true
}
```
* `Text`: Displays 3D text above the aircraft (example: tank quantity, instructions).
* `NUI`: Enables a HUD in the bottom-right of the screen.
***
### 5. Fire Compatibility
Compatibility with external fire systems.
```lua
Config.Fires = {
SmartFires = {
enabled = false,
name = 'SmartFires',
detectionRadius = 30.0,
healthSpeed = 8.0
},
ToxicFire = {
enabled = false,
name = 'firescript',
detectionRadius = 30.0,
healthSpeed = 8.0
},
zFire = {
enabled = false,
name = 'z_fire',
detectionRadius = 30.0,
healthSpeed = 8.0
}
}
```
* `enabled`: Enables compatibility with the fire system.
* `name`: Name of the resource used in your server.
* `detectionRadius`: Radius in meters around the fire where drops are registered.
* `healthSpeed`: Speed at which the fire health decreases with each drop.
{% hint style="danger" %}
**Note:** Only one system should be enabled at a time.
{% endhint %}
***
### 6. Particle Effects
Customize the visual effects for water and vapor sprays.
```lua
Config.Effect = {
water = {
dict = "core",
name = "water_cannon_jet"
},
vapor = {
dict = "core",
name = "ent_amb_smoke_gaswork"
}
}
```
* `dict`: Dictionary (resource) of the particle effect.
* `name`: Particle effect name used for visual immersion.
***
### **6. Key Bindings**
#### **Keys for Interactions**
```lua
Config.Keys = {
DropWaterKey = 306, -- Key to drop water
DropWaterKeyString = '~INPUT_REPLAY_ENDPOINT~', -- Key string to drop water
SirenKey = 86, -- Key to activate the siren
SirenKeyString = '~INPUT_VEH_HORN~', -- Key string to activate the siren
DeleteBucketKey = 38, -- Key to delete the bucket
DeleteBucketKeyString = '~INPUT_PICKUP~' -- Key string to delete the bucket
}
```
*Refer to the* [*FiveM Control Reference*](https://docs.fivem.net/docs/game-references/controls/) *for a list of control codes.*
***
### **7. Language Library**
Edit the text displayed for different actions in multiple languages.
# Compatibility with ToxicFire
This guide explains how to make the Advanced Aerial Firefighting script compatible with the Toxic Fire system.
***
### 1. Manual Integration
#### Step-by-step instructions:
1. Go to the following file in the Toxic Fire resource:
```
server/server.lua
```
2. Scroll to the bottom of the file and add the following code:
```lua
exports('GetAllFires', function()
return AllFires
end)
```
This export makes the `AllFires` data accessible to other scripts, including Advanced Aerial Firefighting.
***
### 2. Final Steps
1. Ensure that the `firescript` resource is started **before** `r_aerialfire` in your `server.cfg`:
```
ensure firescript
ensure r_aerialfire
```
2. Restart your server to apply the changes.
# General Exports
This page explains the available **client-side** exports for the **r\_hbucket** and their usage. These exports allow you to interact with the script programmatically from other resources.
***
#### 1. Exports Overview
**1.1 Get Bucket Water Quantity**
```lua
exports['r_hbucket']:GetAerialWaterQuantity(netId)
```
**Description:** Returns the current **water quantity** of a helicopter using its network ID.
**Parameters:**
* `netId`: The network ID of the helicopter.
**Returns:**
* `number`: The quantity of water remaining. Returns `nil` if the entity doesn't exist or isn't tracked.
**Example Usage:**
```lua
local netId = NetworkGetNetworkIdFromEntity(vehicle)
local quantity = exports['r_hbucket']:GetAerialWaterQuantity(netId)
```
***
**1.2 Set Bucket Water Quantity**
```lua
exports['r_hbucket']:SetAerialWaterQuantity(netId, quantity)
```
**Description:** Sets a new **water quantity** for a specific helicopter and syncs the change with the server.
**Parameters:**
* `netId`: The network ID of the helicopter.
* `quantity`: The new amount of water to set.
**Example Usage:**
```lua
local netId = NetworkGetNetworkIdFromEntity(vehicle)
exports['r_hbucket']:SetAerialWaterQuantity(netId, 1500)
```
# Test it now
Read more: [Test our resources for free with Zap-Hosting](/test-our-resources-for-free-with-zap-hosting)
**Important Notes:**
* The configuration used on the test server may differ from your ideal setup.
***
#### How to Test the Helicopter Bucket on the Test Server
**1. Spawn a Helicopter**
To test the system, spawn the predefined firefighting aircraft using the following command:
```
/car polmav
```
**Note:** The `polmav` is the default model set in the configuration.
You can also use the F1 menu if you are using vMenu or a similar vehicle spawner.
***
**2. Start a Fire**
To simulate a fire that can be extinguished, run this command in the chat:
```
/startfire normal2 5 1
```
**Note:** This will start a fire with 5 flames, using the preset named `normal2`.
***
**3. Refill the Water Tank**
To refill your water tank mid-air:
* **Fly low over any water body** (ocean, lake, or river).
* The script automatically detects water contact and refills the tank.

***
**4. Delete the bucket**
To delete the bucket, you can either delete the helicopter, via a /dv or go to the bucket and follow the instructions.

# Advanced Remote Restraint
The **Advanced Remote Restraint** script is a **premium** and **fully customizable** resource for FiveM servers. This advanced tool provides a realistic and immersive way to immobilize suspects or targets, ideal for law enforcement, roleplay, and tactical scenarios. With sound effects, visual rope models, laser targeting, and a charging system, this script ensures a dynamic and engaging experience for players.
***
#### **What Does This Script Do?**
**💥 Realistic Sound & Visual Effects**
Experience realistic sound and visual effects when using the BolaWrap, enhancing the immersion of your roleplay with each shot.
**🦵 Immobilization System**
Target a suspect’s legs, upper body, or both simultaneously for an effective and realistic immobilization. Perfect for law enforcement or other roleplay scenarios that require restraint.
**🔗 Realistic Ropes**
The script includes modeled ropes that attach to the character during immobilization, adding an extra level of detail to the action and improving the visual effect.
**🔋 Recharge System**
To prevent spamming of the BolaWrap, the script includes a configurable recharge system, allowing players to recharge the BolaWrap at designated points.
**🔴 Laser System**
A synchronized laser system is integrated, which not only displays but also aims at the target with the BolaWrap for a more accurate shot.
**🔑 Permission System**
Fully compatible with **ESX**, **QBCore**, and **standalone** configurations, this script allows for flexible permissions, ensuring that only authorized players can use the BolaWrap.
🎛️ **Fully Configurable Behavior**
Define the vehicles allowed to use the megaphone, customize the keys, distance, volume, and even allow dynamic usage through exports or inventory integration.
***
#### **Standalone & Flexible**
* ✅ Works flawlessly as a **standalone** script.
* 🔄 Fully adaptable to popular frameworks like **ESX or QB-Core**, allowing job restrictions for commands.
***
[Purchase it](https://store.rytrak.fr/package/5645188)
{% embed url="" %}
# General Configuration
This guide will help you configure the script to suit your needs, covering all available options in the `config.lua` file. Each setting is explained step by step.
### **1. General Configuration**
**Language**\
Set the language used by the script.
```lua
Config.Language = 'en' -- Available options: 'en' (English), 'fr' (French).
```
***
### 2. Framework Compatibility
If you're using a framework like **ESX**, **QB**, or **OX Inventory**, enable this setting.
```lua
Config.UseFramework = false
```
* When `true`, the system uses the inventory (e.g., weapon usage) instead of command-based interactions.
* Setup instructions for each framework are available on:
* [ESX Guide](https://docs.rytrak.fr/framework-compatibility/add-a-custom-weapon-on-esx)
* [QBCore Guide](https://docs.rytrak.fr/framework-compatibility/add-a-custom-weapon-on-qbcore)
* [OX Inventory Guide](https://docs.rytrak.fr/framework-compatibility/add-a-custom-weapon-on-ox-inventory)
***
### **3. BolaWrap Settings**
**Enable Aim Assist**\
Enable or disable aim assist when using the BolaWrap.
```lua
Config.EnableAimAssist = false -- Set to true to enable aim assist.
```
**Max Shoot Distance**\
Defines the maximum distance allowed to shoot the BolaWrap.
```lua
Config.MaxShootDistance = 20.0 -- Adjust the distance (in meters) players can shoot the BolaWrap.
```
***
### **4. Recharge System**
**Recharge Coordinates**\
Specifies the coordinates for the recharge station and the radius within which the player can recharge.
```lua
Config.Recharge = {
coords = vector3(-1394.4, -2726.98, 13.94), -- Recharge station coordinates
radius = 3.0, -- Recharge radius
quantityPerRecharge = 3, -- Number of BolaWraps recharged per interaction
}
```
***
### **5. Laser System**
**Enable Laser**\
Enable or disable the laser system.
```lua
Config.Laser = {
enable = true, -- Set to true to enable the laser system
color = { -- Customize the laser color (RGBA)
r = 0,
g = 255,
b = 0,
a = 80
},
maxDistance = 150.0 -- Maximum laser distance (in meters)
}
```
***
### **6. Weapon Settings**
**Define Weapon**\
Sets the weapon identifier for the BolaWrap.
```lua
Config.Weapon = `WEAPON_BOLAWRAP` -- BolaWrap weapon identifier
```
**Weapon Display Name**\
The name displayed in the weapon wheel when equipping the BolaWrap.
```lua
Config.BolawrapWeaponName = "BolaWrap" -- Name displayed in the weapon wheel
```
***
### **7. Key Bindings**
**Laser Key**\
Set the key used to toggle the laser.
```lua
Config.Keys.LaserKey = 86 -- Key to toggle the laser
Config.Keys.LaserKeyString = '~INPUT_VEH_HORN~' -- Display name for the laser key
```
**Release Key**\
Set the key used to release the ropes.
```lua
Config.Keys.ReleaseKey = 311 -- Key to release the ropes
Config.Keys.ReleaseKeyString = '~INPUT_REPLAY_SHOWHOTKEY~' -- Display name for the release key
```
**Refill Key**\
Set the key used to refill the BolaWrap.
```lua
Config.Keys.RefillKey = 311 -- Key to refill the BolaWrap
Config.Keys.RefillKeyString = '~INPUT_REPLAY_SHOWHOTKEY~' -- Display name for the refill key
```
***
### **8. Language Library**
Edit the text displayed for different actions in multiple languages.
# General Exports
This page explains the available exports for the `r_bolawrap` script and how to use them. These client-side exports allow you to interact programmatically with the rope system from other resources.
***
### 1. Exports Overview
#### 1.1 Remove Ropes
```lua
exports['r_bolawrap']:RemoveRopes(targetServerId)
```
**Description:**\
Removes both the upper and lower rope states from a specific player.
**Parameters:**
* `targetServerId`: The server ID of the target player to remove ropes from.
***
#### 1.2 Set Recharge
```lua
exports['r_bolawrap']:SetRecharge(ammo)
```
**Description:**\
Sets the internal recharge count (rope ammo) of the bolawrap device for the local player.
**Parameters:**
* `ammo`*:* Number of rope charges to assign.
***
#### 1.3 Check Rope State
```lua
exports['r_bolawrap']:IsBolawrap(targetServerId)
```
**Description:**\
Returns the current rope state applied to the specified player.
**Parameters:**
* `targetServerId`: The server ID of the player to check for rope state.
**Returns:**
* `'both'`: If the player has both upper and lower ropes applied.
* `'upper'`: If only the upper body of the player is tied.
* `'lower'`: If only the lower body of the player is tied.
* `'nothing'`: If no ropes are applied to the player.
***
### 2. Example Usage
Here is a basic example of how to use the rope exports:
```lua
-- Remove all ropes from player with ID 18
exports['r_bolawrap']:RemoveRopes(18)
-- Set recharge (ammo) of the Bolawrap device to 2
exports['r_bolawrap']:SetRecharge(2)
-- Check the rope state of the player with ID 15
local ropeState = exports['r_bolawrap']:IsBolawrap(15)
if ropeState == 'both' then
print("Player is fully tied!")
elseif ropeState == 'upper' then
print("Player's upper body is restrained.")
elseif ropeState == 'lower' then
print("Player's legs are tied.")
else
print("Player is free.")
end
```
# Test it now
Read more: [Test our resources for free with Zap-Hosting](/test-our-resources-for-free-with-zap-hosting)
**Important Notes:**
* You must have at least two players connected to properly test the bolawrap functionality.
* The configuration used on the test server may differ from your ideal setup.
***
### How to Test the Bolawrap on the Test Server
#### 1. Give Yourself the Bolawrap
To give yourself the Bolawrap, use the following command in the chat:
```
/giveitem me WEAPON_BOLAWRAP
```
#### 2. Open Your Inventory
Press F2 to open your in-game inventory.
#### 3. Use the Bolawrap
Once the Bolawrap is in your inventory, drag it to the use button to equip and use it.
***
### Test Environment
* The bolawrap can be used by any player who has it in their inventory.
* Test the bolawrap at the following coordinates to recharge the item:
#### Coordinates:
* **x:** -1394.4
* **y:** -2726.98
* **z:** 13.94
You can teleport to these coordinates to recharge your Bolawrap.
### How to Teleport
To teleport to the coordinates, open the vMenu via F1 and follow the image below.

# Advanced Extrication System
{% hint style="info" %}
**Good to know:** This resource uses [FiveM Assets Escrow](/fivem-assets-escrow), you need server version 5181 or higher to run resources using this feature.
{% endhint %}
{% embed url="" %}
## **Introduction**
**Advanced Extrication System** is a *paid resource* used for **FiveM** available for purchase [here ](https://store.rytrak.fr/package/5994279)to significantly enhance the gaming experience for players. This script introduces advanced functions designed for your server's firefighters, enabling them to perform complex vehicle extrications by removing vehicle doors or roofs with realistic tools.
# General Configuration
### Config.Language

Choose the language of the resource, we propose the basic language **French *****(fr)*** and **English *****(en)***.
### Config.UseFramework

{% hint style="danger" %}
If you are using ESX or QBCore, please set the UseFramework variable to true, then follow the video tutorial in our documentation to make the script compatible.
This variable is used to remove the command to give the weapon and thus use it from your inventory.
For ESX: [click here](/framework-compatibility/add-a-custom-weapon-on-esx)
For QBCore: [click here](/framework-compatibility/add-a-custom-weapon-on-qbcore)
{% endhint %}
### Config.Spreaders
#### Config.Spreaders.openSpeed
Tool opening speed (the larger the number, the faster the speed)
#### Config.Spreaders.closeSpeed
Tool closing speed (the larger the number, the faster the speed)
#### Config.Spreaders.damageSpeed
Speed of percentage of life decrease (the larger the number, the faster the speed)
### Config.Cutters
#### Config.Cutters.openSpeed
Tool opening speed (the larger the number, the faster the speed)
#### Config.Cutters.closeSpeed
Tool closing speed (the larger the number, the faster the speed)
#### Config.Cutters.damageSpeed
Speed of percentage of life decrease (the larger the number, the faster the speed)
### Config.CutProtection
Time to install the protective cover (in ms)
### Config.LockPeopleInsideCar
The variable enables or disables the player and vehicle blocking system in the event of a serious accident.
### Config.VehicleRoof
List of vehicles compatible with the roof cut-off system (see tutorial on how to make a vehicle compatible [here](/scripts/advanced-extrication-system/adapt-a-vehicle-to-the-roof-system))
### Config.CooldownDelay
Delay in ms to avoid spamming tool usage
### Config.HelpSphere
Configuration of selection spheres
# General Exports
### exports\['r\_extrication']:GetSpreaderRotation()
**Return:**
float: degree of spreader rotation
### exports\['r\_extrication']:GetCutterRotation()
**Return:**
float: degree of cutter rotation
### exports\['r\_extrication']:LockPlayerInsideVehicle(bool)
Export to lock or unlock the locking system in the vehicle
# Adapt a vehicle to the roof system
{% embed url="" %}
{% hint style="danger" %}
We do not provide support for the use of zModeler
{% endhint %}
Here's a video example of how to adapt a vehicle to the roof system
```
point_fl -- front left
point_fr -- front right
point_bl -- rear left
point_br -- rear right
```
Here are the bone names to add to the vehicle:
Don't forget to modify the configuration by adding the vehicle with the extra number
```
brokenDoorRequired = {}
```
The above variable is designed for vehicles where the trunk is connected to the roof, requiring the player to cut the trunk before being able to cut the roof.
```
VEH_EXT_DOOR_DSIDE_F = 0,
VEH_EXT_DOOR_DSIDE_R = 1,
VEH_EXT_DOOR_PSIDE_F = 2,
VEH_EXT_DOOR_PSIDE_R = 3,
VEH_EXT_BONNET = 4,
VEH_EXT_BOOT = 5,
```
Here are the IDs of the various possible doors to put in the brokenDoorRequired variable
# List of vehicles compatible with the roof system
Here is the list of basic GTA V vehicles currently compatible with the latest version of the script This list is likely to evolve as new vehicles are released.
You can make your vehicle as compatible as you like by following the demonstration video [here](/scripts/advanced-extrication-system/adapt-a-vehicle-to-the-roof-system)
# Test it now
Read more: [Test our resources for free with Zap-Hosting](/test-our-resources-for-free-with-zap-hosting)
The in-game test may not have the same configuration you want, check the configuration to see what else you can do.
## Give item
To open your in-game inventory press F2
#### /giveitem me WEAPON\_SPREADER
Allows you to give yourself the spreader.
#### /giveitem me WEAPON\_CUTTER
Allows you to give yourself the cutter.
#### /giveitem me WEAPON\_GLASSMASTER
Allows you to give yourself the glass master.
Spawn one of the vehicles from the list [here ](/scripts/advanced-extrication-system/list-of-vehicles-compatible-with-the-roof-system)to fully test the system.
# Advanced Handcuffs System
{% hint style="info" %}
**Good to know:** This resource uses [FiveM Assets Escrow](/fivem-assets-escrow), you need server version 5181 or higher to run resources using this feature.
{% endhint %}
## **Introduction**
**Advanced Handcuffs Sytem** is a *paid resource* used for **FiveM** available for purchase [here](https://store.rytrak.fr/package/6494429) to significantly enhance the gaming experience for players. This script offers advanced features for all players, whether law enforcement or civilians. It allows users to handcuff, uncuff, cut handcuffs, and tie up another player with a rope. The system is compatible with ESX and QBCore, and can easily be adapted to your framework for seamless integration.
# General Configuration
### Config.Language

Choose the language of the resource, we propose the basic language **French *****(fr)*** and **English *****(en)***.
### Config.EnableCommands
Don't activate if you're using a framework
Order list if enabled:
```
/cuffs
/uncuffs
/rope
/unrope
/grinder
```
### Config.Framework
For each framework, please follow the appropriate documentation
### Config.DisableInventoryKey
Disables the inventory key when the player is handcuffed.
If you're using `ox_inventory`, there's no need to set the keys as they are automatically handled by the system.
### Config.DisableKey
Disables the keys below when the player is handcuffed. To adjust, go to the FiveM key list [here](https://docs.fivem.net/docs/game-references/controls/).
### Config.SyncedCuffs
Keeps the player handcuffed even if he disconnects and reconnects later (this setting works with the player's GTA V license and is saved only in a temporary server table)
### Config.NeedToBeBehind

Set this option to “true” if you want the player to be behind the person in order to handcuff/unhandcuff them. (if false, the player can be in front of the other player to cuff/uncuff him)
### Config.Props
### Config.StatebagsName
# General Exports
Both exports can be used on the client and server side
### exports\['r\_handcuffs']:IsPlayerCuffed(*number*)
***number:*** server id of the person, client-side example: ***GetPlayerServerId(PlayerId())***
**Return:**
true if the player is cuffed, or false if the player is not cuffed.
### exports\['r\_handcuffs']:IsPlayerRope(*number*)
***number:*** server id of the person, client-side example: ***GetPlayerServerId(PlayerId())***
**Return:**
true if the player is tying, or false if the player is not tying.
# Make ESX compatible
1. Activate ESX in the r\_handcuffs script config
1. Add the SQL file 'ESX\_Handcuffs.sql' to your database
3. And finally, add the images of the items to your inventory (in my case it will be ox-inventory)
The images are located in the r\_handcuffs script folder.
For all inventories, the addition of images is more or less identical.
For ox\_inventory the directory is: /ox\_inventory/web/images/
4. Restart your server and take advantage of the items using /giveitem me \
# Make QBCore compatible
1. Activate QBCore in the r\_handcuffs script config
1. Add the following lines to your qb-core/shared/items.lua file at the very bottom
3. And finally, add the images of the items to your inventory (in my case it will be qb-inventory)
The images are located in the r\_handcuffs script folder.
For all inventories, the addition of images is more or less identical.
For qb-inventory the directory is: /qb-inventory/html/images/
4. Restart your server and take advantage of the items using /giveitem \ \
# Make OX-Inventory compatible
1. Activate OX-Inventory in the r\_handcuffs script config
1. Add the following lines to your ox\_inventory/data/items.lua file at the very bottom
```lua
["grinder"] = {
label = "Grinder",
weight = 1,
stack = true,
close = true,
consume = 0,
server = {
export = 'r_handcuffs.grinder'
}
},
["handcuffs"] = {
label = "Handcuffs",
weight = 1,
stack = true,
close = true,
consume = 0,
server = {
export = 'r_handcuffs.handcuffs'
}
},
["handcuff_keys"] = {
label = "Handcuff keys",
weight = 1,
stack = true,
close = true,
consume = 0,
server = {
export = 'r_handcuffs.handcuff_keys'
}
},
["rope"] = {
label = "Rope",
weight = 1,
stack = true,
close = true,
consume = 0,
server = {
export = 'r_handcuffs.rope'
}
},
["knife"] = {
label = "Knife",
weight = 1,
stack = true,
close = true,
consume = 0,
server = {
export = 'r_handcuffs.knife'
}
},
```
{% hint style="danger" %}
If you change the name of the r\_handcuffs script, don't forget to change the export names above!
{% endhint %}
3. And finally, add the images of the items to your inventory (in my case it will be ox-inventory)
The images are located in the r\_handcuffs script folder.
For all inventories, the addition of images is more or less identical.
For ox\_inventory the directory is: /ox\_inventory/web/images/
4. Restart your server and take advantage of the items using /giveitem me \
# Test it now
Read more: [Test our resources for free with Zap-Hosting](/test-our-resources-for-free-with-zap-hosting)
The in-game test may not have the same configuration you want, check the configuration to see what else you can do.
{% hint style="danger" %}
**Good to know:** You must be at least two players to be able to fully test all the features of the handcuffs script
{% endhint %}
## Give item
To open your in-game inventory press F2
#### /giveitem me handcuffs
Allows you to give yourself the handcuffs.
#### /giveitem me handcuff\_keys
Allows you to give yourself the handcuff keys.
#### /giveitem me grinder
Allows you to give yourself the grinder.
#### /giveitem me rope
Allows you to give yourself the rope.
#### /giveitem me knife
Allows you to give yourself the knife.
# Advanced Aerial Firefighting
**Advanced Aerial Firefighting** is a premium resource for FiveM designed to revolutionize your aerial firefighting experience. This script provides total immersion into the role of an aerial firefighter, adding unprecedented realism to your missions.
✨ *Fully customizable*, with this complete configuration, the script adapts to the needs of your server!
***
#### **What Does This Script Do?**
🔥 **Fire Health System**\
Introduces a fire health system to add realism to firefighting operations. Manage the fire's spread and improve your intervention strategies.
💧 **Water Reloading**\
Access water points to refill your plane, ensuring smooth and continuous water dropping operations.
🌫️ **Water Vapor**\
Realistically depicts a trail of water vapor during operations, making every flight more immersive.
🔔 **Drop Alarm**\
Provides an alarm system to prevent accidental water dumping, ensuring safer and more controlled operations.
🚁 **Water Tank NUI**\
Displays a realistic water tank visual in the UI, allowing you to track the remaining water in real-time.
🎮 **Command or Keybind Control**\
Choose how players interact: via custom commands, keybinds, or target UI.
🎯 **Framework System Ready**\
Compatible with the most popular frameworks:
* ESX
* QB-Core
* Or standalone setups.
🌍 **Multilingual Support**\
Available in both French and English, with the option to add your own language in the configuration!
***
#### **Standalone & Flexible**
* ✅ Works flawlessly as a **standalone** script.
* 🔄 Fully adaptable to popular frameworks like **ESX or QB-Core**, allowing job restrictions for commands.
***
[Purchase it](https://store.rytrak.fr/package/6577967)
{% embed url="" %}
# General Configuration
This guide will help you configure the script to suit your needs, covering all available options in the `config.lua` file. Each setting is explained step by step.
***
### **1. General Configuration**
#### **Language**
Set the language used by the script.
```lua
Config.Language = 'en' -- Available options: 'en' (English), 'fr' (French)
```
***
### 2. Framework Compatibility
```lua
Config.ESX = false
Config.QB = false
```
Enable compatibility with **ESX** or **QBCore** frameworks.\
Set to `true` if you want to restrict interactions (e.g., water drop, siren control) to specific jobs defined under each plane (see `manageJobs` under the plane config).
***
### 3. Aircraft Configuration
Create as many aircraft entries as you want using their in-game model names.
```lua
Config.Plane = {
[`cl415`] = {
waterScale = 15.0,
manageJobs = {'pilot'},
manageSeat = {-1, 0},
siren = {
enabled = true,
soundName = 'yelp',
distance = 300.0
},
capacity = 2000,
pumpPower = 8.0,
waterDischargePower = 4.0
}
}
```
* `waterScale`: Size of the water drop visual effect.
* `manageJobs`: Restrict control to jobs (only applies if ESX or QB is enabled).
* `manageSeat`: Determines which seats can operate the system. `-1` is the driver seat.
* `siren`:
* `enabled`: Enables or disables the water drop siren.
* `soundName`: Name of the siren sound played.
* `distance`: Maximum distance where the siren is audible.
* `capacity`: Total water tank capacity in liters.
* `pumpPower`: Speed at which water is pumped into the tank.
* `waterDischargePower`: Flow rate of the water during drop.
***
#### 4. HUD Display
```lua
Config.HUD = {
Text = true,
NUI = true
}
```
* `Text`: Displays 3D text above the aircraft (example: tank quantity, instructions).
* `NUI`: Enables a HUD in the bottom-right of the screen.
***
### 5. Fire Compatibility
Compatibility with external fire systems.
```lua
Config.Fires = {
SmartFires = {
enabled = false,
name = 'SmartFires',
detectionRadius = 30.0,
healthSpeed = 8.0
},
ToxicFire = {
enabled = false,
name = 'firescript',
detectionRadius = 30.0,
healthSpeed = 8.0
},
zFire = {
enabled = false,
name = 'z_fire',
detectionRadius = 30.0,
healthSpeed = 8.0
}
}
```
* `enabled`: Enables compatibility with the fire system.
* `name`: Name of the resource used in your server.
* `detectionRadius`: Radius in meters around the fire where drops are registered.
* `healthSpeed`: Speed at which the fire health decreases with each drop.
{% hint style="danger" %}
**Note:** Only one system should be enabled at a time.
{% endhint %}
***
### 6. Particle Effects
Customize the visual effects for water and vapor sprays.
```lua
Config.Effect = {
water = {
dict = "core",
name = "water_cannon_jet"
},
vapor = {
dict = "core",
name = "ent_amb_smoke_gaswork"
}
}
```
* `dict`: Dictionary (resource) of the particle effect.
* `name`: Particle effect name used for visual immersion.
***
### **6. Key Bindings**
#### **Keys for Interactions**
```lua
Config.Keys = {
DropWaterKey = 306, -- Key to drop water
DropWaterKeyString = '~INPUT_REPLAY_ENDPOINT~', -- Key string to drop water
SirenKey = 86, -- Key to activate the siren
SirenKeyString = '~INPUT_VEH_HORN~' -- Key string to activate the siren
}
```
*Refer to the* [*FiveM Control Reference*](https://docs.fivem.net/docs/game-references/controls/) *for a list of control codes.*
***
### **7. Language Library**
Edit the text displayed for different actions in multiple languages.
# Compatibility with ToxicFire
This guide explains how to make the Advanced Aerial Firefighting script compatible with the Toxic Fire system.
***
### 1. Manual Integration
#### Step-by-step instructions:
1. Go to the following file in the Toxic Fire resource:
```
server/server.lua
```
2. Scroll to the bottom of the file and add the following code:
```lua
exports('GetAllFires', function()
return AllFires
end)
```
This export makes the `AllFires` data accessible to other scripts, including Advanced Aerial Firefighting.
***
### 2. Final Steps
1. Ensure that the `firescript` resource is started **before** `r_aerialfire` in your `server.cfg`:
```
ensure firescript
ensure r_aerialfire
```
2. Restart your server to apply the changes.
# General Exports
This page explains the available **client-side** exports for the **r\_aerialfire** and their usage. These exports allow you to interact with the script programmatically from other resources.
***
### 1. Exports Overview
#### 1.1 Get Aerial Water Quantity
```lua
exports['r_aerialfire']:GetAerialWaterQuantity(netId)
```
**Description:**\
Returns the current **water quantity** of a specific aerial firefighting vehicle using its network ID.
**Parameters:**
* `netId`: The network ID of the aerial firefighting vehicle.
**Returns:**
* `number`: The quantity of water remaining. Returns `nil` if the entity doesn't exist or isn't tracked.
**Example Usage:**
```lua
local netId = NetworkGetNetworkIdFromEntity(vehicle)
local quantity = exports['r_aerialfire']:GetAerialWaterQuantity(netId)
```
***
#### 1.2 Set Aerial Water Quantity
```lua
exports['r_aerialfire']:SetAerialWaterQuantity(netId, quantity)
```
**Description:**\
Sets a new **water quantity** for a specific aerial firefighting vehicle and syncs the change with the server.
**Parameters:**
* `netId`: The network ID of the aerial firefighting vehicle.
* `quantity`: The new amount of water to set.
**Example Usage:**
```lua
local netId = NetworkGetNetworkIdFromEntity(vehicle)
exports['r_aerialfire']:SetAerialWaterQuantity(netId, 1500)
```
# Test it now
Read more: [Test our resources for free with Zap-Hosting](/test-our-resources-for-free-with-zap-hosting)
**Important Notes:**
* The configuration used on the test server may differ from your ideal setup.
***
### How to Test the Aerial Firefighting on the Test Server
#### 1. Spawn a Plane
To test the system, spawn the predefined firefighting aircraft using the following command:
```bash
/car cl415
```
{% hint style="info" %}
**Note:** The `cl415` is the default model set in the configuration.
{% endhint %}
You can also use the F1 menu if you are using vMenu or a similar vehicle spawner.
***
#### 2. Start a Fire
To simulate a fire that can be extinguished, run this command in the chat:
```bash
/startfire normal2 5 1
```
{% hint style="info" %}
**Note:** This will start a fire with 5 flames, using the preset named `normal2`.
{% endhint %}
***
#### 3. Refill the Water Tank
To refill your water tank mid-air:
* **Fly low over any water body** (ocean, lake, or river).
* The script automatically detects water contact and refills the tank.
# Advanced Tactical Gas System
The **Advanced Tactical Gas System** is a premium resource that brings immersive crowd-control and tactical roleplay to the next level — ideal for police forces, military units, riot scenarios, or criminal ambushes.
✨ Designed for realistic visual and gameplay effects, it introduces a fully configurable system of gas grenades, stunning tools, and protective gear.
***
#### **What Does This Script Do?**
💨 **Deploy Tactical Gas Grenades**\
Throw smoke, tear gas, or flash grenades to create tactical advantages or disperse hostile players.
🤕 **Apply Realistic Effects**\
Each grenade triggers detailed effects:
* **Tear Gas** causes coughing, vision blur, and temporary disorientation.
* **Smoke Grenades** obstruct vision with dense particles.
* **Stun Grenades** temporarily blind and disable targets.
👮♂️ **Compatible with Advanced Pepper Spray**\
When **Advanced Pepper Spray** compatibility is enabled:
* Effects from tear gas grenades trigger the same debuffs as the pepper spray.
* Players can use **Decontamination Spray** and other related items from the pepper spray system to cleanse themselves from tear gas effects.
* Without the pepper spray script, tear gas grenades still apply effects, but without the advanced cleansing mechanics.
😷 **Use Protective Equipment**\
Players wearing gas masks or configured gear are immune to the effects of tear gas, adding strategic depth.
🎭 **Customizable Visuals & Behavior**\
Edit every aspect of the effects — from gas duration and damage to visual intensity and immunity.
***
#### **Standalone & Flexible**
* ✅ Works flawlessly as a **standalone** script.
* 🔄 Fully adaptable to popular frameworks like **ESX or QB-Core**, allowing job restrictions for commands.
# General Configuration
This guide helps you configure your script step by step using the `config.lua` file. Each section below details the available options to tailor the behavior of gas grenades, effects, and compatibility.
***
### **1. General Configuration**
#### **Language**
Set the language used by the script.
```lua
Config.Language = 'en' -- Available options: 'en' (English), 'fr' (French)
```
***
### 2. Grenade Types Configuration
Each grenade has its own behavior and configuration.
#### 3.1 Tear Gas Grenade
Config.Grenade['tearGas']
* `weaponModel`: Hash name of the weapon.
* `weaponProp`: Prop model shown in-game.
* `weaponDisplay`: Wheel weapon name.
* `disableControl`: Disables sprint, vehicle entry, fight, and jump during exposure.
* `effects`:
* `timecycle`: Visual effects applied.
* `shakeCamera`: Screen shaking intensity and style.
* `smokeScale`: Size of the smoke cloud.
* `smokeDuration`: Duration in milliseconds (e.g., `50000`).
* `smokeParticles`: Defines the FX dictionary and particle.
* `gasMask`: Masks that grant immunity (see section 4).
* `gasMaskItem`: The configuration only works if one of the three frameworks is enabled. You must then create the gasMask item in your framework and define it here. If the player then carries this item in their inventory, they will not be affected by the effects.
**Compatibility**
* `pepperspray`: Enables sync with `r_pepperspray`.
```lua
Config.Grenade['tearGas'].compatibility = {
enabled = false,
resourceName = 'r_pepperspray',
applyEffect = 'pepperspray' -- The pepperspray name in the config.lua file of the Advanced Pepper Spray script.
}
```
***
#### 3.2 Stun Grenade
Config.Grenade['stun']
* `weaponModel`: Hash name of the weapon.
* `weaponProp`: Prop model shown in-game.
* `weaponDisplay`: Wheel weapon name.
* `disableControl`: Disables sprint, vehicle entry, fight, and jump during exposure.
* `flashDuration`: Duration of blinding/stunning effect in milliseconds.
* `flashScale`: Intensity of the flash visual effect
* `flashSound`: Enable or disable flashbang sound effect
* `flashVolume`: Volume of the flashbang sound (0.0 to 1.0)
* `stunMask`: Masks that grant immunity (see section 4).
* `stunMaskItem`: The configuration only works if one of the three frameworks is enabled. You must then create the gasMask item in your framework and define it here. If the player then carries this item in their inventory, they will not be affected by the effects.
***
#### 3.3 Smoke Grenade
Config.Grenade['smoke']
* `weaponModel`: Hash name of the weapon.
* `weaponProp`: Prop model shown in-game.
* `weaponDisplay`: Wheel weapon name.
* `smokeScale`: Size of the smoke cloud.
* `smokeDuration`: Duration in milliseconds (e.g., `50000`).
* `smokeParticles`: Defines the FX dictionary and particle.
***
### 3. Gas Mask Protection
Prevents gas effects if players are wearing certain masks or accessories.
The structure is:
```lua
[PED_MODEL] = {
[componentId] = {drawableId, drawableId}
}
```
* Example: `[5] = {2}` → Component 5 (mask) with drawable 2.
* Supports both male (`mp_m_freemode_01`) and female (`mp_f_freemode_01`) characters.
* See the documentation for component IDs.
***
### 4. UI Design
Customize the visual progress bar used during recovery animations (e.g., after gas exposure).
```lua
Config.Design = {
ProgressBar = {
color = {52, 152, 219}, -- RGB
text = 'RECOVERY' -- Max 8 characters
}
}
```
If `text` is empty, the bar will expand without label.
***
### **5. Key Bindings**
#### **Keys for Interactions**
Set the keys used for actions when `CommandEnabled` is set to false.
```lua
Config.Keys = {
GrabAndDropKey = 289, -- Key to grab and release a person.
GrabAndDropKeyString = '~INPUT_REPLAY_START_STOP_RECORDING_SECONDARY~', -- Key name for display.
TaskEnterKey = 305, -- Key to put a person in the vehicle.
TaskEnterKeyString = '~INPUT_REPLAY_STARTPOINT~' -- Key name for display.
}
```
*Refer to the* [*FiveM Control Reference*](https://docs.fivem.net/docs/game-references/controls/) *for a list of control codes.*
***
### **6. Language Library**
Edit the text displayed for different actions in multiple languages.
# General Exports
This page explains the available exports for the **r\_tacticalgas** script and how to use them. These client-side exports allow you to interact programmatically with the pepper spray system from other resources.
***
### **1. Exports Overview**
#### **1.1 SetOverrideWearingMask**
```lua
exports['r_tacticalgas']:SetOverrideWearingMask(state)
```
**Description:** Override the gas mask detection (for compatibility with other scripts).
**Parameters:**
* `state`: True to force gas mask detection, false to use normal checks.
# Compatibility with ESX
This guide explains how to make the **Advanced Tactical Gas System** compatible with **ESX** and your inventory system.
***
### 1. Follow Our Integration Guide
Before anything else, follow our dedicated guide:\
➡️ [**Add a Custom Weapon on ESX**](/framework-compatibility/add-a-custom-weapon-on-esx)
This will help you correctly register the stun, smoke, and tear gas grenades in your weapon database.
***
### 2. Configure Your Inventory
Unlike OX Inventory, **you should not** add `throwable = true` in ESX-based systems.\
The implementation depends entirely on the inventory you're using. Each ESX inventory system is structured differently.
Let’s take the **default `esx_inventory`** as an example:
#### Default `esx_inventory` Example
1. Open the file:\
`config.lua` of your inventory system
2. Scroll down to find the variable:
```lua
Config.Throwables = { ... }
```
3. Add the **hashes** of the grenades used in the Advanced Tactical Gas System:
```lua
Config.Throwables = {
-- Existing entries...
WEAPON_GRENADE_STUN = -1136999868,
WEAPON_GRENADE_SMOKE = -1858931262,
WEAPON_GRENADE_TEARGAS = -1567258436,
}
```
{% hint style="danger" %}
**Important:** These hashes represent the weapon models. Without adding them, your inventory may not recognize or allow players to throw the grenades properly.
{% endhint %}
***
### Summary of Hashes
| Weapon | Hash |
| ------------------------ | ----------- |
| WEAPON\_GRENADE\_STUN | -1136999868 |
| WEAPON\_GRENADE\_SMOKE | -1858931262 |
| WEAPON\_GRENADE\_TEARGAS | -1567258436 |
# Compatibility with QBCore
This guide explains how to make the **Advanced Tactical Gas System** fully compatible with **QBCore** and ensure the new grenades (Stun, Smoke, and Tear Gas) function correctly in your framework and weapon logic.
***
### 1. Follow the Main Integration Guide
Start by following our core documentation:\
➡️ [**Add a Custom Weapon on QBCore**](/framework-compatibility/add-a-custom-weapon-on-qbcore)
***
### 2. Update the `qb-weapons` Resource
To ensure proper logic and grenade handling, you must update the **`qb-weapons`** resource:
#### Step-by-Step:
1. Navigate to:
```
qb-weapons/client/main.lua
```
2. Scroll to **line 129**, where the throwable weapons are listed inside a conditional statement.
3. **Modify the line** to include the custom grenade weapon names:
#### Original Line:
```lua
elseif weaponName == 'weapon_stickybomb' or weaponName == 'weapon_pipebomb' or weaponName == 'weapon_smokegrenade' or weaponName == 'weapon_flare' or weaponName == 'weapon_proxmine' or weaponName == 'weapon_ball' or weaponName == 'weapon_molotov' or weaponName == 'weapon_grenade' or weaponName == 'weapon_bzgas' then
```
#### Modified Line (add the new grenades):
```lua
elseif weaponName == 'weapon_stickybomb' or weaponName == 'weapon_pipebomb' or weaponName == 'weapon_smokegrenade' or weaponName == 'weapon_flare' or weaponName == 'weapon_proxmine' or weaponName == 'weapon_ball' or weaponName == 'weapon_molotov' or weaponName == 'weapon_grenade' or weaponName == 'weapon_bzgas' or weaponName == 'weapon_grenade_stun' or weaponName == 'weapon_grenade_smoke' or weaponName == 'weapon_grenade_teargas' then
```
# Compatibility with OX Inventory
This guide explains how to make the **Advanced Tactical Gas System** fully compatible with **OX Inventory**.
***
### 1. Follow Our Integration Guide
To ensure smooth integration, first follow our general setup guide:\
➡️ [**Add a Custom Weapon on OX Inventory**](/framework-compatibility/add-a-custom-weapon-on-ox-inventory)
This will help you add the required weapons correctly into the OX Inventory system.
***
### 2. Modify the Weapons Table
When you reach the step for adding weapons to your inventory’s configuration, you must include a specific line to ensure proper functionality of grenades.
Update your weapon entries like this:
```lua
['WEAPON_GRENADE_STUN'] = {
label = 'Stun Grenade',
weight = 400,
throwable = true, -- Required for correct grenade behavior
},
['WEAPON_GRENADE_SMOKE'] = {
label = 'Smoke Grenade',
weight = 400,
throwable = true, -- Required for correct grenade behavior
},
['WEAPON_GRENADE_TEARGAS'] = {
label = 'Tear Gas Grenade',
weight = 400,
throwable = true, -- Required for correct grenade behavior
},
```
***
### ❗ Why is `throwable = true` required?
Without this line, the grenades may not behave as expected in-game.\
By setting `throwable = true`, OX Inventory recognizes the weapon as a throwable item, allowing correct interaction and usage logic with the script.
# Test it now
Read more: [Test our resources for free with Zap-Hosting](/test-our-resources-for-free-with-zap-hosting)
**Important Notes:**
* The configuration used on the test server may differ from your ideal setup.
***
### How to Test the Tactical Gas System on the Test Server
#### 1. Give Yourself a Gas Grenade
To give yourself a gas grenade (tear gas, smoke, or stun), use the following command in chat:
```
/giveitem me WEAPON_GRENADE_TEARGAS
/giveitem me WEAPON_GRENADE_SMOKEGAS
/giveitem me WEAPON_GRENADE_STUNGRENADE
```
***
#### 2. Open Your Inventory
Press **F2** to open your in-game inventory (if using a compatible inventory like **OX**, **ESX**, or **QB**).
***
#### 3. Use the Grenade
Drag the grenade to your use slot. Once equipped, aim and throw as you would with any throwable weapon.
***
#### 4. Test the Effects
After detonation:
* **Tear Gas**: Will blur vision, disable some controls, and trigger a coughing animation (pepperspray effects).
* **Smoke Grenade**: Displays heavy visual smoke without gameplay effects.
* **Stun Grenade**: Blinds and stuns temporarily.
Try throwing the grenades:
* At yourself to test visual/audio feedback.
* At other players to test multiplayer sync and effects.
# Advanced Shields System
The **Advanced Tactical Gas System** is a premium resource that brings immersive crowd-control and tactical roleplay to the next level — ideal for police forces, military units, riot scenarios, or criminal ambushes.
✨ Designed for realistic visual and gameplay effects, it introduces a fully configurable system of gas grenades, stunning tools, and protective gear.
***
#### **What Does This Script Do?**
💨 **Deploy Tactical Gas Grenades**\
Throw smoke, tear gas, or flash grenades to create tactical advantages or disperse hostile players.
🤕 **Apply Realistic Effects**\
Each grenade triggers detailed effects:
* **Tear Gas** causes coughing, vision blur, and temporary disorientation.
* **Smoke Grenades** obstruct vision with dense particles.
* **Stun Grenades** temporarily blind and disable targets.
👮♂️ **Compatible with Advanced Pepper Spray**\
When **Advanced Pepper Spray** compatibility is enabled:
* Effects from tear gas grenades trigger the same debuffs as the pepper spray.
* Players can use **Decontamination Spray** and other related items from the pepper spray system to cleanse themselves from tear gas effects.
* Without the pepper spray script, tear gas grenades still apply effects, but without the advanced cleansing mechanics.
😷 **Use Protective Equipment**\
Players wearing gas masks or configured gear are immune to the effects of tear gas, adding strategic depth.
🎭 **Customizable Visuals & Behavior**\
Edit every aspect of the effects — from gas duration and damage to visual intensity and immunity.
***
#### **Standalone & Flexible**
* ✅ Works flawlessly as a **standalone** script.
* 🔄 Fully adaptable to popular frameworks like **ESX or QB-Core**, allowing job restrictions for commands.
# General Configuration
This guide helps you configure your script step by step using the `config.lua` file. Each section below details the available options to tailor the behavior of gas grenades, effects, and compatibility.
***
### **1. General Configuration**
#### **Language**
Set the language used by the script.
```lua
Config.Language = 'en' -- Available options: 'en' (English), 'fr' (French)
```
***
#### **Use Outdated Version**
Enable this option to suppress alert messages when using an older version of the script.
```lua
Config.UseOutdatedVersion = false -- Set to true if using an outdated script version.
```
***
### 2. Framework Compatibility
If you're using a framework like **ESX**, **QB**, or **OX Inventory**, enable this setting.
```lua
Config.UseFramework = false
```
* When `true`, the system uses the inventory (e.g., weapon usage) instead of command-based interactions.
* Setup instructions for each framework are available on:
* [ESX Guide](https://docs.rytrak.fr/framework-compatibility/add-a-custom-weapon-on-esx)
* [QBCore Guide](https://docs.rytrak.fr/framework-compatibility/add-a-custom-weapon-on-qbcore)
* [OX Inventory Guide](https://docs.rytrak.fr/framework-compatibility/add-a-custom-weapon-on-ox-inventory)
***
### 3. Grenade Types Configuration
Each grenade has its own behavior and configuration.
#### 3.1 Tear Gas Grenade
Config.Grenade['tearGas']
* `weaponModel`: Hash name of the weapon.
* `weaponProp`: Prop model shown in-game.
* `weaponDisplay`: Wheel weapon name.
* `disableControl`: Disables sprint, vehicle entry, fight, and jump during exposure.
* `effects`:
* `timecycle`: Visual effects applied.
* `shakeCamera`: Screen shaking intensity and style.
* `smokeScale`: Size of the smoke cloud.
* `smokeDuration`: Duration in milliseconds (e.g., `50000`).
* `smokeParticles`: Defines the FX dictionary and particle.
* `gasMask`: Masks that grant immunity (see section 4).
**Compatibility**
* `pepperspray`: Enables sync with `r_pepperspray`.
```lua
Config.Grenade['tearGas'].compatibility = {
enabled = false,
resourceName = 'r_pepperspray',
applyEffect = 'pepperspray' -- The pepperspray name in the config.lua file of the Advanced Pepper Spray script.
}
```
***
#### 3.2 Stun Grenade
Config.Grenade['stun']
* `weaponModel`: Hash name of the weapon.
* `weaponProp`: Prop model shown in-game.
* `weaponDisplay`: Wheel weapon name.
* `disableControl`: Disables sprint, vehicle entry, fight, and jump during exposure.
* `flashDuration`: Duration of blinding/stunning effect in milliseconds.
* `flashScale`: Intensity of the flash visual effect
* `flashSound`: Enable or disable flashbang sound effect
* `flashVolume`: Volume of the flashbang sound (0.0 to 1.0)
* `gasMask`: Masks that grant immunity (see section 4).
***
#### 3.3 Smoke Grenade
Config.Grenade['smoke']
* `weaponModel`: Hash name of the weapon.
* `weaponProp`: Prop model shown in-game.
* `weaponDisplay`: Wheel weapon name.
* `smokeScale`: Size of the smoke cloud.
* `smokeDuration`: Duration in milliseconds (e.g., `50000`).
* `smokeParticles`: Defines the FX dictionary and particle.
***
### 4. Gas Mask Protection
Prevents gas effects if players are wearing certain masks or accessories.
The structure is:
```lua
[PED_MODEL] = {
[componentId] = {drawableId, drawableId}
}
```
* Example: `[5] = {2}` → Component 5 (mask) with drawable 2.
* Supports both male (`mp_m_freemode_01`) and female (`mp_f_freemode_01`) characters.
* See the documentation for component IDs.
***
### 5. UI Design
Customize the visual progress bar used during recovery animations (e.g., after gas exposure).
```lua
Config.Design = {
ProgressBar = {
color = {52, 152, 219}, -- RGB
text = 'RECOVERY' -- Max 8 characters
}
}
```
If `text` is empty, the bar will expand without label.
***
### **6. Key Bindings**
#### **Keys for Interactions**
Set the keys used for actions when `CommandEnabled` is set to false.
```lua
Config.Keys = {
GrabAndDropKey = 289, -- Key to grab and release a person.
GrabAndDropKeyString = '~INPUT_REPLAY_START_STOP_RECORDING_SECONDARY~', -- Key name for display.
TaskEnterKey = 305, -- Key to put a person in the vehicle.
TaskEnterKeyString = '~INPUT_REPLAY_STARTPOINT~' -- Key name for display.
}
```
*Refer to the* [*FiveM Control Reference*](https://docs.fivem.net/docs/game-references/controls/) *for a list of control codes.*
***
### **7. Language Library**
Edit the text displayed for different actions in multiple languages.
# Test it now
Read more: [Test our resources for free with Zap-Hosting](/test-our-resources-for-free-with-zap-hosting)
**Important Notes:**
* The configuration used on the test server may differ from your ideal setup.
***
### How to Test the Tactical Gas System on the Test Server
#### 1. Give Yourself a Gas Grenade
To give yourself a gas grenade (tear gas, smoke, or stun), use the following command in chat:
```
/giveitem me WEAPON_GRENADE_TEARGAS
/giveitem me WEAPON_GRENADE_SMOKEGAS
/giveitem me WEAPON_GRENADE_STUNGRENADE
```
***
#### 2. Open Your Inventory
Press **F2** to open your in-game inventory (if using a compatible inventory like **OX**, **ESX**, or **QB**).
***
#### 3. Use the Grenade
Drag the grenade to your use slot. Once equipped, aim and throw as you would with any throwable weapon.
***
#### 4. Test the Effects
After detonation:
* **Tear Gas**: Will blur vision, disable some controls, and trigger a coughing animation (pepperspray effects).
* **Smoke Grenade**: Displays heavy visual smoke without gameplay effects.
* **Stun Grenade**: Blinds and stuns temporarily.
Try throwing the grenades:
* At yourself to test visual/audio feedback.
* At other players to test multiplayer sync and effects.
# Advanced Sheriff Grab Ped
{% hint style="info" %}
**Good to know:** This resource uses [FiveM Assets Escrow](/fivem-assets-escrow), you need server version 5181 or higher to run resources using this feature.
{% endhint %}
## **Introduction**
**Advanced Sheriff Grab Ped** is a *paid resource* used for **RedM** available for purchase [here](https://store.rytrak.fr/package/5940239), this resource is standalone but can be adapted to a framework to potentially use a job system.
Our version for FiveM is available [here](https://store.rytrak.fr/package/4919539).
{% embed url="" %}
# General Configuration
### Config.Language

Choose the language of the resource, we propose the basic language **French *****(fr)*** and **English *****(en)***.
### Config.CommandEnabled

Set **true** if you want to use the command system.
### Config.GrabCommand

Command to which the grab ped will be activated if you set the [Config.CommandEnabled](#config.commandenabled) to **true**.
### Config.RedEM
Set enabled to **true** if you want to use the RedEM job system, so define the jobs you want to access.
### Config.RSG
Set enabled to **true** if you want to use the RSG job system, so define the jobs you want to access.
### Config.VORP
Set enabled to **true** if you want to use the VORP job system, so define the jobs you want to access.
### Config.Hint

This variable displays or not an information on the top left of your screen to let the player go more easily ([Config.CommandEnabled](#config.commandenabled) must be **true**)
### Config.DisableSprint

Disable the sprint (recommended: **true**)
### Config.ColisionRange
Collision distance (0.0 to disable the dragged player's collision)
### Config.AttachPosition
Positioning of the player facing the police officer.
### Config.Animations
Animation system to take the player by the arm.
# General Exports
### exports\['r\_grab\_redm']:GrabPlayer(*player*)
Export to drag the player
### exports\['r\_grab\_redm']:IsGrabbed()
**Return:**
true if the player is dragged, false if the player is not dragged
# Add a custom weapon on ESX
{% embed url="" %}
{% hint style="danger" %}
Don't forget to add the weapon image to your inventory system.
The images are located in each our script file.
For all inventories, the addition of images is more or less identical.
For qb-inventory the directory is: /qb-inventory/html/images/
For ak47\_qb\_inventory the directory is: /ak47\_qb\_inventory/web/build/images/
For ox\_inventory the directory is: /ox\_inventory/web/images/
For esx\_inventory the directory is: /esx\_inventory/html/img/items/
{% endhint %}
{% hint style="info" %}
When you've finished creating your item, don't forget to set UseFramework to true in the config.lua file of the script in question!
{% endhint %}
List of weapon names in our scripts:
#### Advanced Megaphone System
`WEAPON_MEGAPHONE`
#### Advanced Pepper Spray
`WEAPON_PEPPERSPRAY`
`WEAPON_ANTIDOTE`
#### Advanced Remote Restraint
`WEAPON_BOLAWRAP`
#### Advanced Extrication System
`WEAPON_SPREADER`
`WEAPON_CUTTER`
`WEAPON_GLASSMASTER`
#### Advanced Tactical Gas System
`WEAPON_GRENADE_SMOKE`
`WEAPON_GRENADE_STUN`
`WEAPON_GRENADE_TEARGAS`
# Add a custom weapon on QBCore
{% embed url="" %}
{% hint style="danger" %}
Don't forget to add the weapon image to your inventory system.
The images are located in each our script file.
For all inventories, the addition of images is more or less identical.
For qb-inventory the directory is: /qb-inventory/html/images/
For ak47\_qb\_inventory the directory is: /ak47\_qb\_inventory/web/build/images/
For ox\_inventory the directory is: /ox\_inventory/web/images/
For esx\_inventory the directory is: /esx\_inventory/html/img/items/
{% endhint %}
{% hint style="info" %}
When you've finished creating your item, don't forget to set UseFramework to true in the config.lua file of the script in question!
{% endhint %}
List of weapon names in our scripts:
#### Advanced Megaphone System
`WEAPON_MEGAPHONE`
#### Advanced Pepper Spray
`WEAPON_PEPPERSPRAY`
`WEAPON_ANTIDOTE`
#### Advanced Remote Restraint
`WEAPON_BOLAWRAP`
#### Advanced Extrication System
`WEAPON_SPREADER`
`WEAPON_CUTTER`
`WEAPON_GLASSMASTER`
#### Advanced Tactical Gas System
`WEAPON_GRENADE_SMOKE`
`WEAPON_GRENADE_STUN`
`WEAPON_GRENADE_TEARGAS`
# Add a custom weapon on OX Inventory
{% embed url="" %}
{% hint style="danger" %}
Don't forget to add the weapon image to your inventory system.
The images are located in each our script file.
For all inventories, the addition of images is more or less identical.
For qb-inventory the directory is: /qb-inventory/html/images/
For ak47\_qb\_inventory the directory is: /ak47\_qb\_inventory/web/build/images/
For ox\_inventory the directory is: /ox\_inventory/web/images/
For esx\_inventory the directory is: /esx\_inventory/html/img/items/
{% endhint %}
{% hint style="info" %}
When you've finished creating your item, don't forget to set UseFramework to true in the config.lua file of the script in question!
{% endhint %}
List of weapon names in our scripts:
#### Advanced Megaphone System
`WEAPON_MEGAPHONE`
#### Advanced Pepper Spray
`WEAPON_PEPPERSPRAY`
`WEAPON_ANTIDOTE`
#### Advanced Remote Restraint
`WEAPON_BOLAWRAP`
#### Advanced Extrication System
`WEAPON_SPREADER`
`WEAPON_CUTTER`
`WEAPON_GLASSMASTER`
#### Advanced Tactical Gas System
`WEAPON_GRENADE_SMOKE`
`WEAPON_GRENADE_STUN`
`WEAPON_GRENADE_TEARGAS`

If the weapon gets a bug similar to the gif below (the weapon vibrates) follow the tutorial
1. Go to the ox\_inventory/modules/weapon/client.lua directory
2. Go to line 77 and replace the two selected lines as shown in the photo below with our code
Replace:
```
SetCurrentPedWeapon(playerPed, data.hash, true)
SetPedCurrentWeaponVisible(playerPed, true, false, false, false)
```
by this:
```lua
local weaponAddons = {
'WEAPON_MEGAPHONE',
'WEAPON_PEPPERSPRAY',
'WEAPON_ANTIDOTE',
'WEAPON_BOLAWRAP',
'WEAPON_SPREADER',
'WEAPON_CUTTER',
'WEAPON_GLASSMASTER',
'WEAPON_GRENADE_SMOKE',
'WEAPON_GRENADE_STUN',
'WEAPON_GRENADE_TEARGAS'
}
local function isWeaponAddons(hash)
for _,v in pairs(weaponAddons) do
if hash == GetHashKey(v) then
return true
end
end
return false
end
if not isWeaponAddons(data.hash) then
SetCurrentPedWeapon(playerPed, data.hash, true)
SetPedCurrentWeaponVisible(playerPed, true, false, false, false)
end
```
# Test our resources for free with Zap-Hosting
**Zap-Hosting** offers you the possibility to test our resources for free, you can support us by using our discount code **Rytrak-1469** on 🎉

You can now connect to our FiveM test server with the ip ***fivem.rytrak.fr***
Or search directly for our server by typing `"Rytrak"` in the search bar
### Testing our resources
On each documentation of our resources there is a category `how to test it` here you will find all the information to test it (orders, coordinates, cars, ..)
On the server, the vMenu will be accessible via the **F1** key, you can no-clip via the **F11** key.
You can spawn a vehicle via the **/car** command and delete it via **/dv**